ORANGE EASEL
  • Summer 2019
  • Orange Easel e-Classes
  • Kids Classes
  • Birthdays
  • Beyond Classes
  • For Current Students
  • Orange Easel Blog
  • Contact Us or Find Us
  • Calendar
  • Special Events
  • FAQs
  • About Us
  • Summer 2019
  • Orange Easel e-Classes
  • Kids Classes
  • Birthdays
  • Beyond Classes
  • For Current Students
  • Orange Easel Blog
  • Contact Us or Find Us
  • Calendar
  • Special Events
  • FAQs
  • About Us
Search
WELCOME TO THE STUDIO

O R A N G E    E A S E L    B L O G

Dark Play for Winter Evenings

2/9/2018

 
This is part two of my musings on art in the dark lately.  We just finished our Light and Dark unit with our preschoolers (read more here) in the studio.  I'm hoping THIS post inspires you to incorporate dark play into your home. 

Although my kids are almost teenagers, I remember what winter was like with kids cooped up all day.  I remember the post-nap, pre-dinner hours being the worst.  It was cold.  It was dark.  And everyone was cranky.

On these short winter days, my kids would BEG to play in the dark.  They would help me pick up the main rooms in the house (I told them it was for safety) and once everything was clean...er, I mean, safe, we would turn off all the lights in the house.  Then, we would get out the different lights and PLAY.

The possibilities are limitless.  Just normal play is novel when you have to use a flashlight to see it.  

But of course, art is our favorite kind of creative play.  And since we're an art studio, I've compiled a list of some of my favorite Art-in-the-Dark ideas for home use.  No fancy supplies needed.  Just some basic art supplies and a light source.  (there's a  light source list at the end too)

At-Home Ideas

Capture the Shadows
Picture
Shadow tracing on the chalkboard
A single light source in a room should make some interesting shadow.  See if you can "catch" them!  You'll need a piece of paper and a drawing tool.  It's also helpful to have a clipboard or something hard to tape your paper too. 

Move around your room and when you find a shadow, place your paper underneath it and trace it.  Older artists can do this with charcoal for a value study.  You can even move your light around to MAKE shadows.  Woven baskets,  folliage, and small figures make the most interesting designs.
Shadow Building
Picture
Paper shapes clipped in place...perfect for tracing!
Older artists will enjoy setting up a shadow still life.  Start with a light source on your drawing surface.  Then add objects to create shadows onto your paper.   The scavenger hunt around the house is just as much fun as the art part!

​Once your happy with your shadow creation, trace the edges to "save" it.  Sharpie markers are our favorite for this one!
Build a Light Box
Picture
Easy to set-up. Easy to store.
You'll use a light box/table for a few of the ideas below. You can spend a fortune on a light table.  Or you can just use what you have laying around the house and make one when you need one. 

Find a shallow plastic storage bin that allows for light to filter through.  We love an under-the-bed storage box for this one.  If it's got a clear lid, you can put the lights inside.  If not, turn it upside down and put the lights underneath it.  (White Christmas lights work really well for this!)  Our sand art video below shows our light box in great detail at about the 2 minute mark. 

Once you've got one built, keep reading for ideas on what to do on your light box!
Mess-Free Finger Painting
Paint right on top of the light and see those colors in a whole new way!  Fill a gallon zip-top plastic bag with a few dollops of  paint.  Secure the edges and top with clear packing tape and tape flat to the light table**.   Artists can squish the paint around in the bag to mix the colors.  Older artists can even draw designs in the paint.

**You can do this same one in light too.  Tape to a window or glass door and the sunshine will make a similar effect.  Plus, the vertical work surface conditions those core stability muscles and shoulder muscles that all kids need for great fine motor skills.
Sand Drawings
Picture
Sand drawings on the light box
I know.  Sand.  Inside.  Ew.  

Stay with me. It's really not that messy.  Promise.  We're going to build a giant Etcha-Sketch.

Cover the floor under the light box with a drop cloth.  We love canvas drop cloths from the paint department at the home improvement stores but you can use a plastic tablecloth too. Next, find a clear plastic tub/container that fits on top of your light box.   Fill your tub with a super-duper thin layer of sand**.  The fine sand from Dollar Tree is our favorite.  It comes in different colors and the darker colors work best
Now, use your fingers (or a stick for those kids who don't want to touch it) to draw a design in the sand.  Erasing is as easy and giving the container a gentle shake.  

**You can substitue flour, cornmeal, sugar, etc if you don't have sand.
VIEW OUR FACEBOOK LIVE VIDEO to see the close up of our light box and this sand drawing in action.  Fast-forward to 2 minute when I actually start talking about the sand:
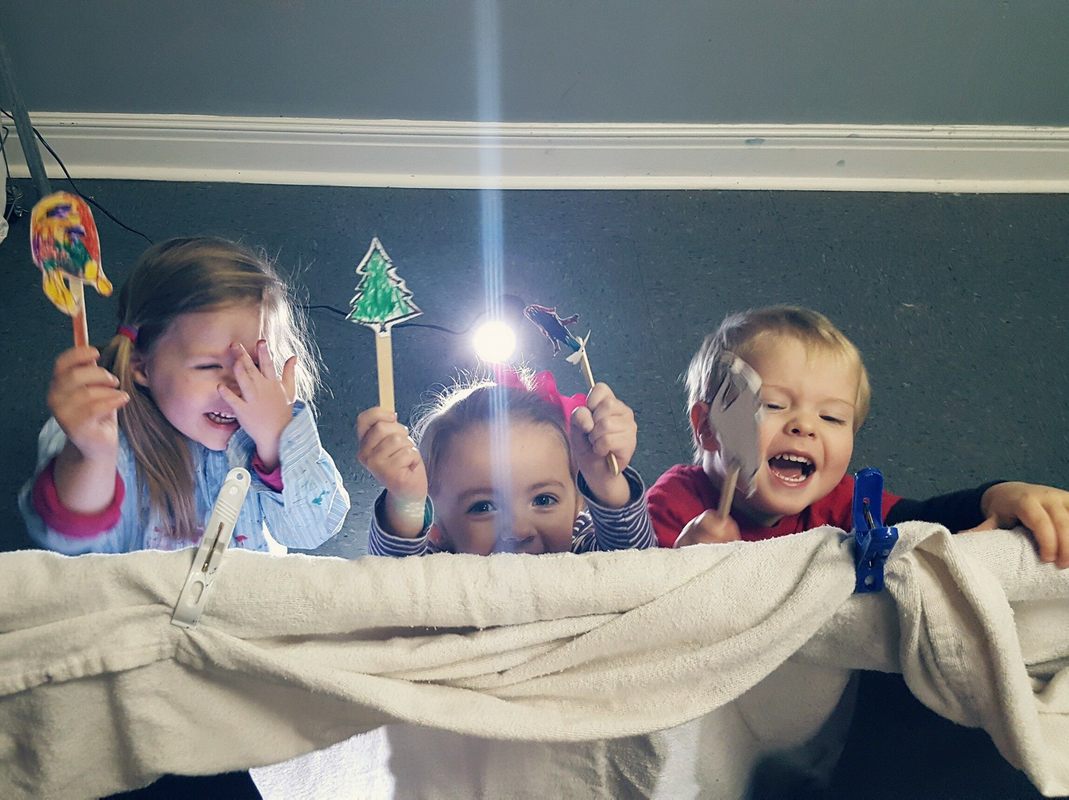
Shadow Puppet Theatre
Picture
Working behind the puppet show curtain (our audience is seated out in front).
Point a single light source on a blank wall.  . We've found that a large, really bright flashlight works best for this.   (Unless you happen to have an old overhead projector.  That's truly the best.)

Now, you need puppets.  You can create them from card stock and popscicle sticks.  If you have older kids who can do this on their own, go for it.  If your kids LOVE shadow puppet theatre, go for it.  But if you're a busy mom of littles and you're just trying this for the first time and you're not sure how it's going to go over with the critics, let's just use what we have, okay?  Look in the toy bin.  Find toys that make good (recognizable) shadows and have a easy "handle"
Picture
Peek behind the curtain...giggle, giggle...
Once everything is set up, use the puppets to cast the shadows on the wall.  The closer to the wall, the sharper the image, but then it kinda defeats the purpose of the shadow play (because you can just watch the object...lol).  'Make up a silly story using the shadows.  Let your artists join in on the story.

If your kids LOVE this, you can take it to the next step and hang a curtain for them to work BEHIND and cast shadows out to the audience like you see in the picture above.  Not only is this more set-up work for you, this is a more difficult concept for most kids because they can't see the show that they are putting on.  They will only see the  backstage view and not the shadows.   But the audience will ONLY see the shadows, not the objects.  If you do this one, DEFINITELY set up your phone to record their show so they can watch it afterwards!)

Lighting Options

Start building your collection of illuminating toys!  Here are some of our favorites:
  • Small flashlights - our most versatile tool.  Use for exploring, playing with toys, and creating shadows. 
  • Fingerlights - best for dance parties (WARNING: These break easier and have teeny batteries inside.  Not good for young children who might find these batteries and swallow)
  • Chrismas lights - cast interesting shadows and turn any room into a magical world.  Also great inside a light box.
  • Glow sticks - sticks and connectors...like legos in the dark.  What can you build?  Plus they are waterproof and are really fun in the bathtub
  • Headlamps - perfect for accessorizing action-oriented dark play (or exploring)'
  • Overhead projectors - these things are like GOLD for creating shadows.  If you have one, treasure it.  If you have one and you don't want it, let me know! :)
  • Push lights - they don't put off a ton of light but they sure are fun to turn off and on.  We even have one that casts stars and a moon onto the ceiling. 
  • Battery-operated lanterns - these are good for illuminating a room and casting shadows all around.  

Sumi Ink Caterpillars

2/2/2018

 
This week, we tried something new in our preschool classes:  We used sumi ink and brushes to draw.   

Since our class was all about caterpillars today, we drew caterpillars.  I think you could draw anything.  Butterflies would be fun.  And I can't wait to do self portraits like these (It's on the schedule for one of our summer classes).
Picture
We began by looking at photographs of caterpillars and talking about the different parts of a caterpillar.  We learned that there are different kinds of caterpillars that have different features.   I had the children give me directions on how I should draw a caterpillar on the white board.  
Picture
Then we passed out large sheets of paper and invited the artists to find a spot on the floor to work.  I feel like for the scale of the paper and the length of our brushes, the floor was the best place for them.  We handed out a small amount of ink in individual glass jars (like a tiny bit of ink...a little goes a long way!).
Picture
There's something magical about preschool line drawings.   They are bold. Their subjects are both simplified and amplified.  Usually we do them with black sharpies.  But INK is a whole 'nother level.
Picture
Sumi ink is rich, black liquid.  It paints on so smoothly.  And it covers the surface quickly (which is important for preschoolers).   Unlike the sharpie, a brush gives us thick lines and thin lines. And even some scratchy lines where our artists were running out of ink.  
Picture
Unlike our tempera paint, the ink isn't gloppy and thick.  But it also doesn't run and drip like watercolors.  It's the perfect consistency.
Picture
If you try out some sumi ink at home, make sure that you protect your surfaces and wear a paint shirt! 

​(And get those frames ready because you're going to need them!)

Exploring Contrast in Preschool Art Class

1/29/2018

 
Hands-on, age appropriate learning, for preschoolers in the art room. We explore the concept of contrast (light and dark) through story and playful art making.
Our Fundamentals class has been studying dark and light, black and white, all month long.  This week, we read the book Flashlight by Lizi Boyd.

To get warmed up for class, we traced shadows in a dark room by flashlight.  How tricky it is to hold the flashlight in one hand and draw with the other! 
Hands-on, age appropriate learning, for preschoolers in the art room. We explore the concept of contrast (light and dark) through story and playful art making.
er\\This picture book tells the story of a boys adventure through the woods with a flashlight.  He discovers many animal friends using his flashlight.  The illustrations are primarily black and white.  Only the subjects illuminated by the beam of light are in color.  The darkness surrounding his is illustrated in a lower-contrast grey.
Hands-on, age appropriate learning, for preschoolers in the art room. We explore the concept of contrast (light and dark) through story and playful art making.
Our artists enjoyed telling the story (since their are no words) and looking deep into the shadows to see if they could see what was happening behind the scenes, unknown to the boy and his flashlight. 

In reading our story, we pointed out the uniqueness of the illustrations and the artist's use of contrast.   Then, we gave our artists some charcoal to respond to the story in their journal.

We used both compressed charcoal, charcoal pencils, and white charcoal.  We also had blending stumps.
Hands-on, age appropriate learning, for preschoolers in the art room. We explore the concept of contrast (light and dark) through story and playful art making.
Artists worked inside their journals which keeps a record of each story we read.
Hands-on, age appropriate learning, for preschoolers in the art room. We explore the concept of contrast (light and dark) through story and playful art making.
Blending and smudging the charcoal is the best part.
Hands-on, age appropriate learning, for preschoolers in the art room. We explore the concept of contrast (light and dark) through story and playful art making.
Our responses to the story show the same darkness, shadows, and low contrast as the book illustrations.  Some of our artists chose to document the animals while other drew the boy.
PHands-on, age appropriate learning, for preschoolers in the art room. We explore the concept of contrast (light and dark) through story and playful art making.
Hands-on, age appropriate learning, for preschoolers in the art room. We explore the concept of contrast (light and dark) through story and playful art making.
Our journals each got a quick spray with fixative and a sticker to label the date and the story.  And then we moved on to the next activity!  (nothing in our 90 minute class lasts more than 15-20 minutes).
I hope we've inspired you to explore shadows-and-highlights with your preschoolers either at home or in the classroom!  
Picture

More from the Preschool Art Room:

Picture
Picture
Picture

3doodler Review

8/25/2015

0 Comments

 
We've had out 3Doodlers for a month now and I finally feel comfortable writing a short review of the product.  If you're not familiar with the 3Doodler, check out the video link below for the newer 2.0 models:
Our studio invested in a few of the 2.0 because they were quieter and lighter and not too much more expensive than the older model.  We currently have three of the 3D printing pens.  We've used them for two classes and the our instructors have had a chance to play with them.  


Here's what we've learned:
  • It's really hard to draw in the air.  They make it look easy on promo video; it's not.
  • Like any art medium, there's a learning curve.  The more we practiced with them, the better we became at controlling the plastic.
  • We had the best luck "building" by creating flat pieces and the assembling them (see video below)
  • The type of plastic matter.  Some projects are great in ABS while others (like the butterfly below) worked much better in PLA.  The 3Doodler 2.0 came with both.
  • Dealing with mechanical issues...either jammed plastic and plastic not feeding correctly was incredibly time-consuming.  Patience and persistence is required.  Although there's no reason that young artists can't USE the pens to create, an adult would need to be present to keep things "flowing."
  • Youtube is your best friend for troubleshooting
Check out the video of the butterfly Miss Allison made from a translucent blue PLA plastic:

Want to play with a 3Doodler?

Our Emerging Artists class which meets on Wednesdays nights will have access to use the 3Doodlers whenever they wish.  We'll also be using them during many of our Camps and Makerspace Events! 
0 Comments

Fancy Letters

5/13/2015

0 Comments

 
Picture

Traditionally the illuminated letter is the first letter of a word at the start of each paragraph.  

The handwritten books during the Middle Ages included large ornate letters.

As a art form, illuminated letters an stand-alone as individual pieces of art.  They made wonderful decorations for the first page of an art journal or a notebook since they are often personal to the artist.

Read More
0 Comments

ONe Point Perspective - VANISHING POINT

1/20/2015

0 Comments

 
Have you ever tried to draw the interior of a room and the funny angles of the walls and furniture make your drawing look more like a carnival fun house instead of a something grounded in reality?

Your problem can be solved if you understand drawing perspective.

Our drawing fundamentals class spend this week's lesson learning the principles of one-point perspective (next week, we look at two-point).  

Some guidelines as you begin to grasp this concept:
Picture
  • One-point perspective only works if your viewer is facing the horizon dead-on.  In an interior room that is the furthest wall.
  • One-point perspective only works if your walls are square to the horizon and the object inside the room follow those walls (i.e. furniture is not set on a diagonal in the room)
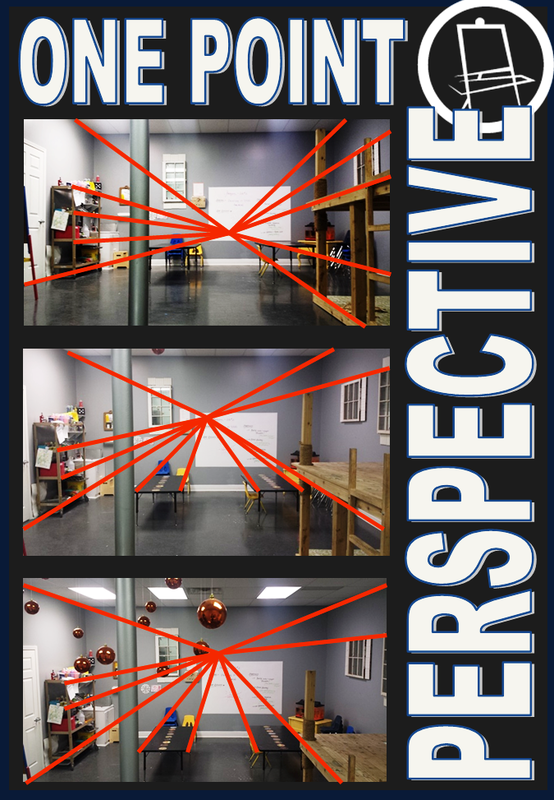
The first thing to identify is the vanishing point.  Your vanishing point is at eye level of the viewer.  If you're creating a drawing from your own creative brain, this is important to know -- because where ever you set your vanishing point, you "put" your viewer there. 

Take a look at the photos above.  The vanishing point is higher and lower because the camera was raised and lowered.  Notice that the bottom photo is the perspective of a REALLY tall person but the top photo is taken from the perspective of a small child.  The vanishing point shifts up or down the depending on the viewer.  

Once you have your vanishing point established, the rest of the lines radiate out from the center.  Table tops, table legs, shelves, mirrors, picture frames, baseboards...anything that follows the walls of the room.  

Assuming all of your furniture follows the walls, your drawing should be composed of only three types of lines:  Vertical, Horizontal, and lines that radiate from the vanishing point.
0 Comments

Grid Drawing

1/15/2015

0 Comments

 
Our Drawing Fundamentals class has spent the last two weeks focusing on ACCURACY.  Accuracy in rendering a subject, either from a photo or from still-life, is one of the first skills that we work on.  Angles and shapes fit together in the proper scale and proportions.  

Talented artists who can render accurately have amazing EYES.  It's not just the hands that draw.  We would even argue that hands aren't even the most important tool in drawing.  Drawing begins with the eyes and an awareness of how these angles and shapes fit together.  
Picture
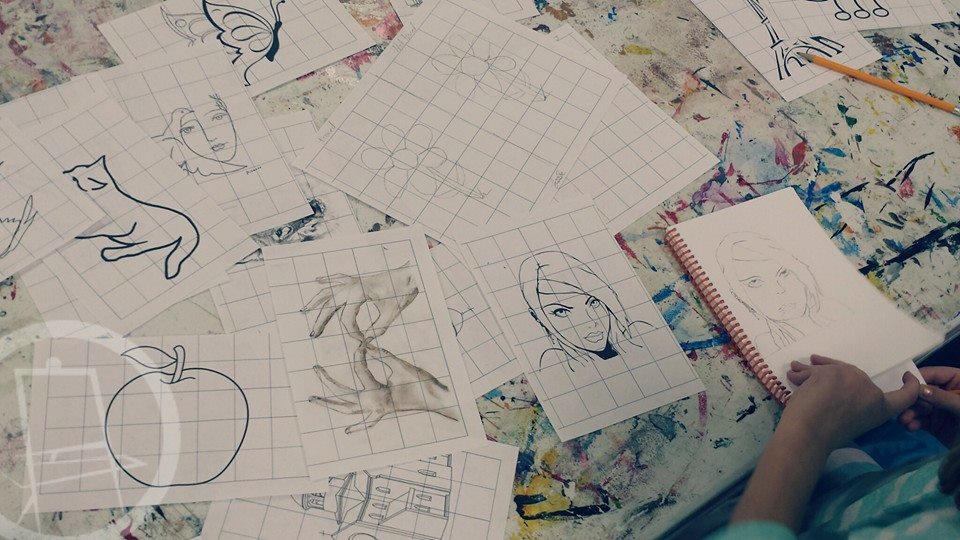
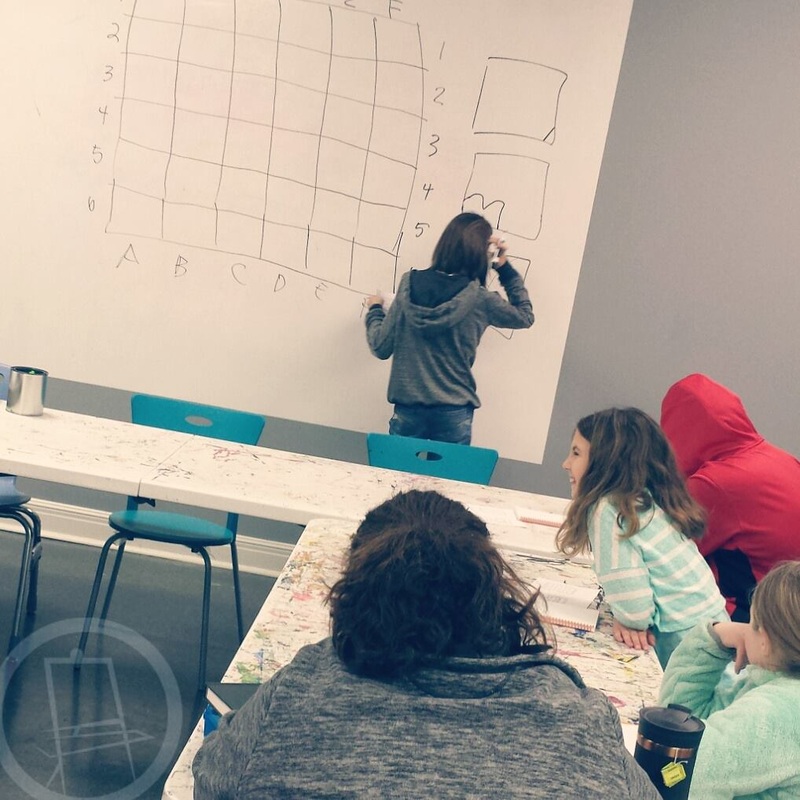
One of the best ways to train our eyes to SEE these relationships is through drawing on a grid.  

Grids break up the large page into smaller, more-manageable spaces.   They give us a roadmap to follow.  It's easier to plot a point and hit the target if we narrow the playing field!
Below is an example of a simple grid drawing.
Picture
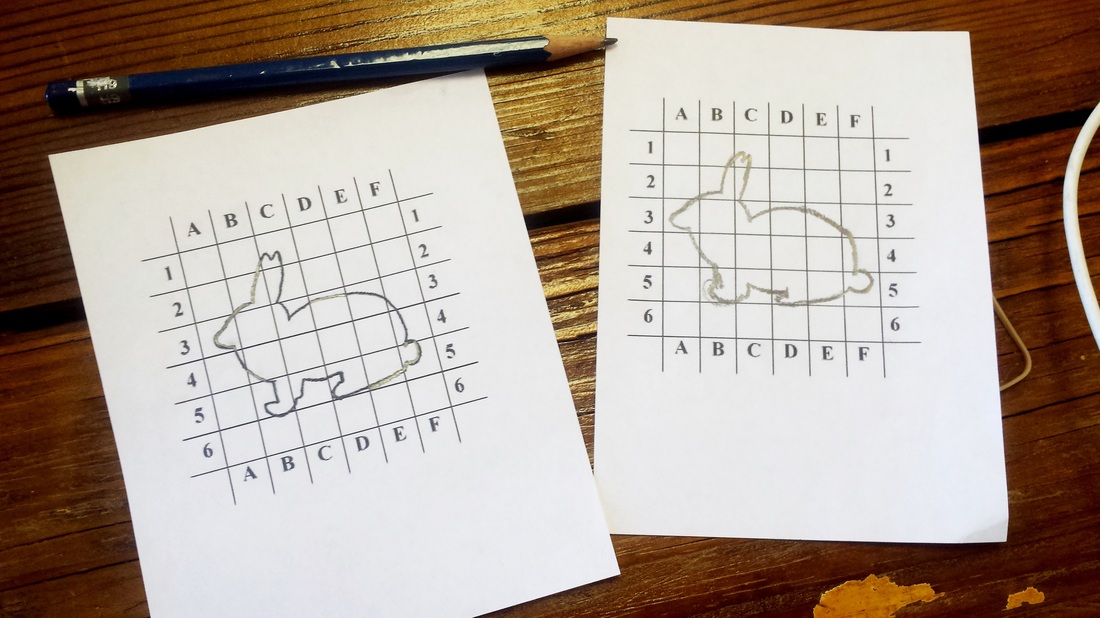
The original line drawing is on the left and the artist's rendering is on the right.  Completing this drawing without a grid, is much more difficult! (We know.  We tried!)
Our artists found it easier to work in one square at a time and to "jump" around, instead of working in neighboring squares.

We followed a 1:1 ratio on our grid drawings so that we could check our accuracy after we were done by overlay our drawing over the original.  

We used simple line drawings, but this exercise works with photographs as well.


Picture
Click here to download a printable grid and simple line drawing that you can try at home!
(Easter-themed, because we're dreaming of spring!)
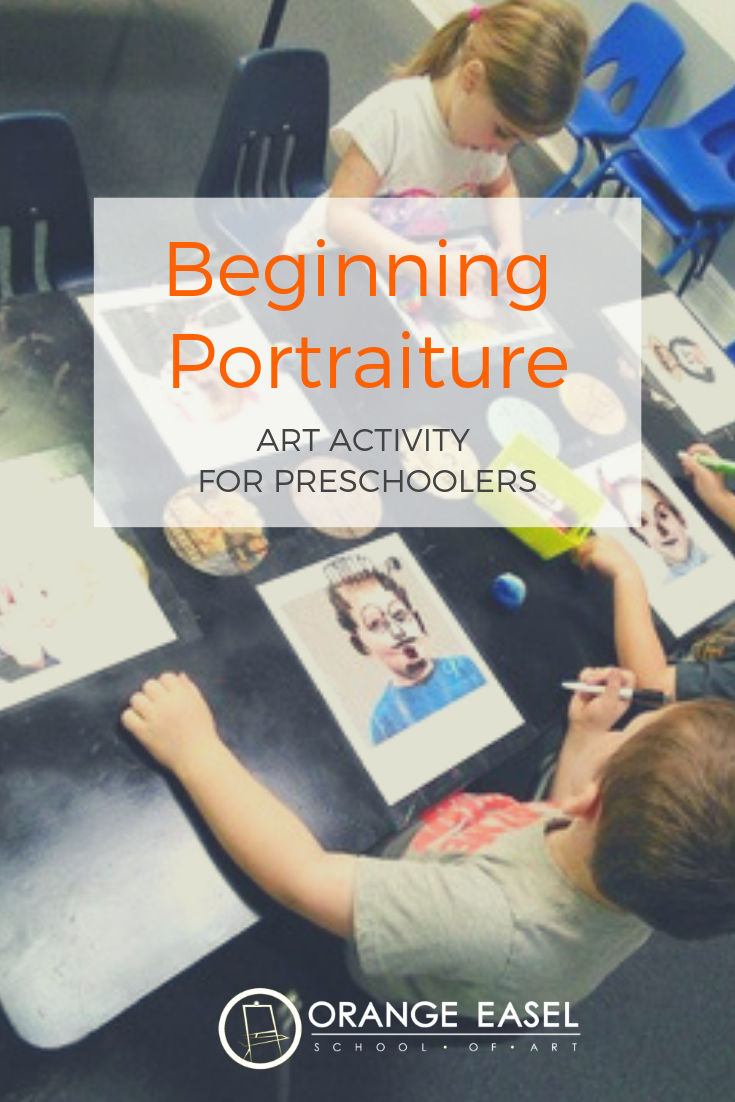
0 Comments

Beginning Portrait Art Activity for Young Artists

10/20/2014

0 Comments

 
Picture
Here's a fun portrait activity for preschoolers and young elementary artists.  It's a great way to reinforce the placement of facial features on future portraits!

It's also silly and captivating for a young audience.  For you teachers out there--it uses very basic supplies and it easy to set up and take down.

Art Activity Set-up

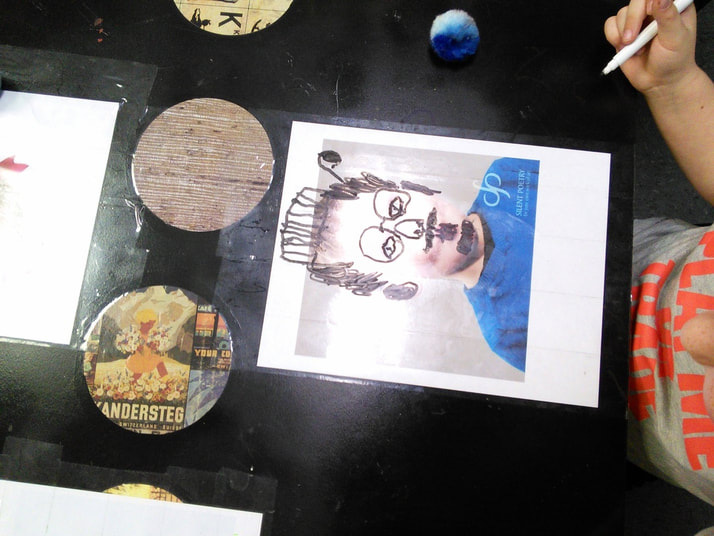
For our classes this week, we taped color photos to the table using clear packing tape.   The photos are just printed from a google image search.  You could also use photos from magazines.

An alternative to the packing would be to laminate your printed pictures or to place them in plastic page protectors.  

We set up our tables prior to the start of class.  All that's left to do is play!

The Art Invitation

Using dry erase markers, the artists can trace eyes, noses, mouths, ears, eyebrows, hairs, etc. Just for fun, we also added mustaches, glasses, hats, and other accessories!

We erased our drawings with colorful pom poms!
Picture
Picture
Picture
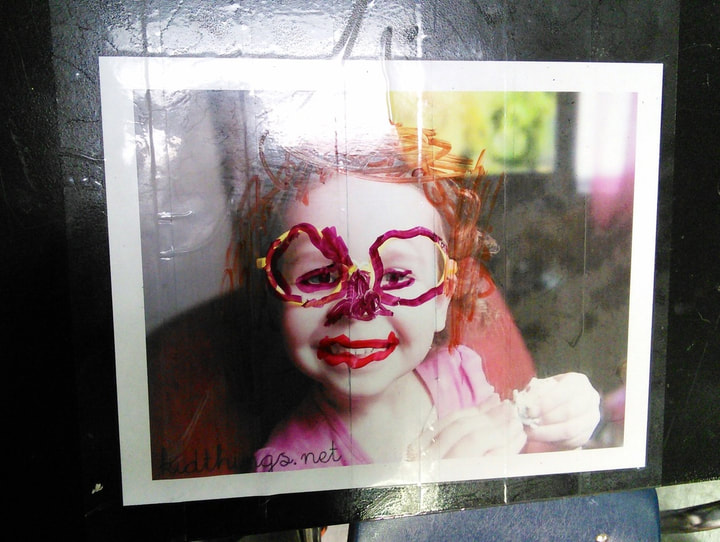
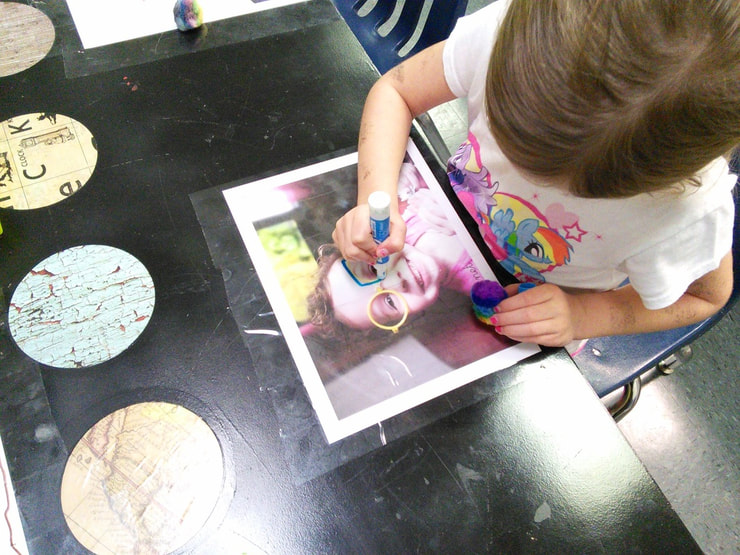
There were so many giggles during this drawing activity.  And some really wonderful conversation.  Some of our artists added accessories to the portrait but many of them simply reinforced the features that were already there...tracing over the eyes, coloring in the mouth, following the path of the nose, etc.

​It was a playful and non-intimidating way to introduce portraiture to our class!  I hope you get to try it out in your room!
Picture
0 Comments

After School Art

8/26/2014

0 Comments


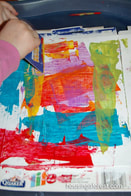
Art-Making {Transition from School to Home}

Picture
The first thing my kids want to do when they get home from school is get a snack and veg-out in front of the television.  (Admittedly, some days, that exactly what happens.)  But my favorite thing to do with them after school is paint.  
Picture
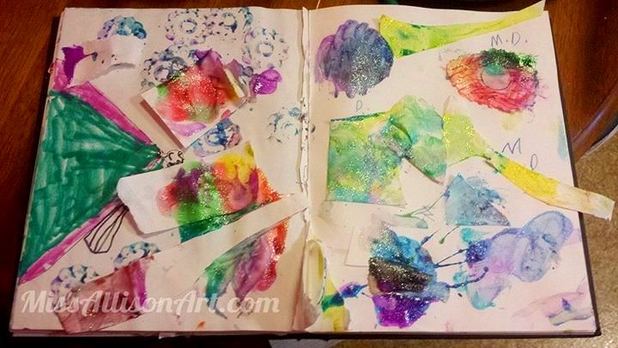
Paint is inviting.  It's sensory.  It's open-ended.  Plus, they don't fight while they're doing it.  AND, sometimes they actually tell me about their day while they paint! 
We don't always paint.   Sometimes we draw or sculpt. I like to have an activity planned for them when they get off the bus.  

My favorite art activities are PROCESS-FOCUSED...meaning, that the emphasis is on the experience of creating the art instead of trying to achieve an end-product (we call that CRAFT).

Here, I had dug out some forgotten colored pencils and a spiral notebook.  Ava decided she wanted to fill her book with different monster drawings.  She drew monsters. I drew monsters.  And we talked about our day while dinner cooked.  

It's important to note that your kids don't care if you can draw.  As a matter of fact, they probably think that you draw really well.  (don't tell them otherwise)


Picture
I put together a collection of some of my favorite art invitations for after school.  These are invitations that are require very little prep on your part.  Some of these may seem "too young" for your big kids, but never underestimate the older kids' desire to finger paint.  (And how GOOD it is for them!)

Art Invitations

Picture
Credit Card Painting
Picture
Marshmallow sculptures
Picture
Paper plate weaving
Picture
Bubbling Art
Picture
Finger Painting
Picture
Melted Crayon Rocks
Picture
Graph Paper Drawings
Picture
Art Journals
Check some of these out.  And, if you try one, or if you have your own favorites, tell me about it in the comments below! 
0 Comments

Encouraging Drawing (Toddlers/Preschoolers)

8/4/2014

0 Comments

 
How to encourage mark-making and longer drawing sessions with young children -- try some of these engaging sound games!
Some little ones don't know what to do with a marker and a blank sheet of paper.  

Heck, some big people don't know what to do with a marker and a blank sheet of paper!

If you've got a hesitant artist at home or one that doesn't draw for very long, uou can encourage different types of marks with sound games.  ​In each of these games, the parent or caregiver is drawing WITH the child. 

​I like to share a big sheet of paper, but you can each have you're own if you'd like.  
How to encourage mark-making and longer drawing sessions with young children -- try some of these engaging sound games!

Scribbling sound games

The adult sets up the "game" (Look!  My marker is a firetruck!) and then demonstrates the mark and sound that is made.  The child will probably choose to imitate both your sound and your action.  Once the child begins to lose interest, demonstrate another type of mark.  If the child makes a mark that is different, imitate his/her mark and sound.  This game is fun to play in a GROUP of preschoolers, too!
Some Sounds To Try:
How to encourage mark-making and longer drawing sessions with young children -- try some of these engaging sound games!
  • Pretend the marker is a choo-choo train.  Make a train noise as you move your marker across the paper in a straight horizontal line.
  • Pretend the marker is a bouncy ball.  Starting at the baseline, "jump" your marker up to the middle of the page and back down to the baseline.  Say "boing, boing" each time the marker goes up.
  • Pretend the marker is a race car.  Start on one edge of the paper.  Determine that the other edge is the finish line.  "Vroom" across the paper as fast as you can.  
  • Make big dots.  Place the marker tip on the paper.  Raise it up HIGH using your whole arm (all the way to your shoulder) and bring it down to the paper to make a dot.  Repeat.  Sing "dot, dot, dot" each time time the marker contacts the paper.  
  • Make quiet dots.  Same as above but the marker doesn't come off the page very high and you only whisper the word "dot" each time.
  • Make a "siren."  While making a firetruck noise (woo-woo-woo), swirl your marker in a spiraling motion.  
  • Make an ocean.  While making wave noise, draw a wavy line slowly from one side of the paper to the other.  
  • Make a bubble.  While making a bubble noise (you'll have to come up with your own...I can't explain mine here...) draw a closed circle.  Note: this is going to be hard for the youngest ones. Make sure you start with the spiraling one first!
I hope you give this a try at home or in your classroom!  Let me know how it goes!
Picture
0 Comments
    ORANGE EASEL

    Orange Easel

    Content inspired by the artists and art created in our studio.

    Picture
    Orange Easel began as a small art studio in my basement and continues to grow and serve our community.  Read more about our story here.

    Archives

    February 2019
    January 2019
    December 2018
    November 2018
    October 2018
    September 2018
    August 2018
    July 2018
    June 2018
    May 2018
    April 2018
    March 2018
    February 2018
    January 2018
    November 2017
    October 2017
    August 2017
    June 2017
    May 2017
    April 2017
    March 2017
    January 2017
    May 2016
    March 2016
    February 2016
    January 2016
    November 2015
    October 2015
    September 2015
    August 2015
    July 2015
    June 2015
    May 2015
    April 2015
    March 2015
    January 2015
    December 2014
    November 2014
    October 2014
    September 2014
    August 2014
    May 2014

    Categories

    All
    2014 2015 Curriculum
    2014-2015 Curriculum
    2015 16 Curriculum
    Art History
    Art Projects
    At Home Ideas
    Charcoal
    Child Development
    Christmas
    Color Mixing
    Drawing
    Event Photos
    Halloween
    Ink
    Kansas City Love
    Kindergarters
    Metal Arts
    Middle School
    Miss Allison's Art
    Mixed Media
    New Years
    Orange Easel
    Paint
    Painting
    Parenting
    Preschool
    Preschool Art
    Preschool Playtime
    Printables
    Printmaking
    Recipes
    School
    Sculpture
    Sensory
    Slime
    Special Needs
    Springtime Art
    Storytime Art
    Student Art Gallery
    Summer Classes
    Tips
    Toddler Art
    Tutorial
    Tutorials
    Valentine's Day
    Videos
    Yarn

    RSS Feed

Picture
LIBERTY STUDIO
​249 W Mill St Ste 107 
Liberty MO 64068
816-407-9266
PLATTE WOODS STUDIO
7617 NW Prairie View Rd
Kansas City MO 64157
816-216-7126
Copyright © 2014 Orange Easel. All rights reserved.
Privacy Policy
Photos used under Creative Commons from r.nial.bradshaw, a.pasquier, Steve A Johnson, wStrauss, BLW Photography, daspader, shawncampbell, USFWS Headquarters, Joybot, HomeSpot HQ, creations by e.b.shumate, chefranden
  • Summer 2019
  • Orange Easel e-Classes
  • Kids Classes
  • Birthdays
  • Beyond Classes
  • For Current Students
  • Orange Easel Blog
  • Contact Us or Find Us
  • Calendar
  • Special Events
  • FAQs
  • About Us