
|
This post contains affiliate links.
Our experience
 Last year's parade crew in their TEAM Orange Easel shirts. I also think that screen printing BLACK INK on a white shirt is probably not the way to go on your first print! This year's design with WHITE INK on dark orange seemed so much less stressful!  Our 2018 Fall Festival Volunteer shirts Since our design as some pretty intricate details, we choose to create our screen using the photo emulsion. The kit also comes with the drawing fluid and screen filler that you can use to hand paint your screen if you have a simpler design. The instructions that come with the kit are extensive--and for good reason! They are well-written and easy to follow (provided you read them). Understand that you're probably not going to get the kit and print tshirts in the same day. Preparing the screen takes a little time. First step is mixing the photo emulsion and spreading it nicely on the screen. You want a thin layer that fills the screen evenly and doesn't have any globs or drops. This isn't as easy as it sounds--since you're spreading a liquid over a porous screen, the green goop kinda ends up everywhere. Do this over the sink. The photo emulsion is light sensitive once it dries, so it needs to be kept in a dark space until you're ready to expose it with your transparency. I put ours inside a empty dresser drawer in the girls bathroom and then taped that drawer shut with half a roll of duct tape (along with some sharpied words-of-warning for anyone who dare open it). The Speedball instruction book suggest putting the wet screen inside a black garbage bag if you can't find a dark closet or room. I wouldn't recommend that. We tried that the first year and ended up having to redo the screen when the emulsion dried with plastic stuck all-bunched up next to it.  See my IG Story of the whole process here! I had our design printed on transparency by Office Depot because the inkjet in the office makes a smudgy mess when printing on film. Plus, then you don't have to buy a whole box of transparency papers. Next step, is making a sandwich. This sandwich is made with the screen on the bottom, the transparency in the middle, and a piece of glass on top to hold everything in place. Then, the whole sandwich is carefully placed outside onto a black sheet of paper. The paper's important so that the light doesn't reflect off the sidewalk and expose the underside of the screen. (Tip: We took our glass out of a picture frame. From the dollar store.) The sun hardens the photo emulsion where the transparency ISN'T. Where there is ink on the transparency, the screen will later rinse clean. I recommend checking the exposure time table in the instructions. And then adding just a few more seconds. A slightly over-exposed screen can be salvaged with a little extra elbow grease. A slightly under-exposed screen just washes down the drain!  I know it seems like a lot of work up to this point, but I promise with was downhill from here. And I was able to print about 30 shirts in under an hour (for under $100) so it's all worth it. Once the screen was rinsed and dried (and cured briefly in the sun again), I was ready to print. I glued four pennies to the corners of my screen so that it would sit slightly above my t-shirt. You can see that I didn't attach them last year (see video below) and spent the a great deal of time trying to get them lined up with the frame for each print. Duh. #thingsyoulearnthesecondtime Make a practice print on paper first. Heck, make LOTS of practice prints. Screenprinting is an ART. With practice, you'll get a feel for how much ink and how much pressure. Here's me printing four shirts for this year. You'll notice I don't put any cardboard or anything inside the shirt. I did that the first year and then realized that the ink wasn't bleeding through and the extra step was causing finger prints and smudges. If you need a bunch of matching shirts and you want to save a little money with a DIY, I highly recommend you try screen printing your own! The screens can be saved for future printing of the same designed or completely cleaned and reused with a new design. (Any budding entrepreneurs who are interested in a design and printing biz...this would be make a great gift!)
    More DIY-ing Fun:
It's no secret that we make a lot of slime here in the studio. So, naturally, I have a favorite kind to make. It's stretchy. It's squishy. It's marshmallow-y. It's fool proof. If you've struggled to make a successful slime in your home...try this recipe :)

My Favorite Slime Video TutorialIs this Art?
So, is slime art?
We understand that some may question a slime activity as part of an art lesson. It's not your traditional art form. ? But, in it's process we get to exercise so many of our maker skills that are important for art. We make decisions about color and texture. We have silly ideas and the freedom to try to bring them to life. We test out theories and change our plans when things go awry. We gain confidence when we have success. There is so much joy in the process. Maybe fine art needs a fine product at the end to "count." But we don't. ?. The act of creating is what matters to us. We're growing artists and makers and creators who will change the world. One slime recipe at a time. ? #theworldneedsmoreartists #makesomething 
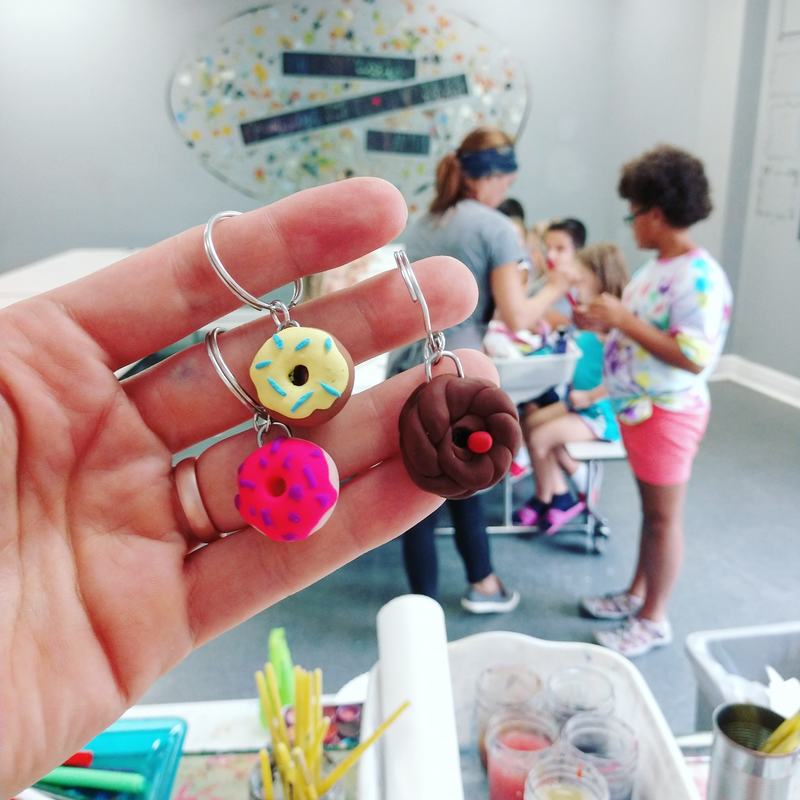
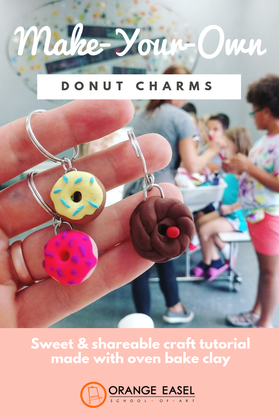
How adorable are these donut charms?! We made them at our day-long donut art camp this fall and they were a HUGE hit!
They are pretty impressive looking and not-too-difficult to make. If you want to try it out at home with your kids or you're just curious about the process, Miss Sam and I made a video:
If you make some, let us know! We'd love to see pictures of your art!


This post contains affiliate links.
Creepy Crawly Spider WebsPrep paper with blue tape border. Teacher tip: Tape it to the table too! Since we're going to be covering the page with watercolors, this will keep the paper from wrinkling up too much. Talk to your young artists about what spider webs look like. Show some pictures of spider webs--trace the lines with your finger! Hand out the paper and invite artists to make their spider webs with the oil pastels. (After all, what are spider webs except a bunch of lines!?) 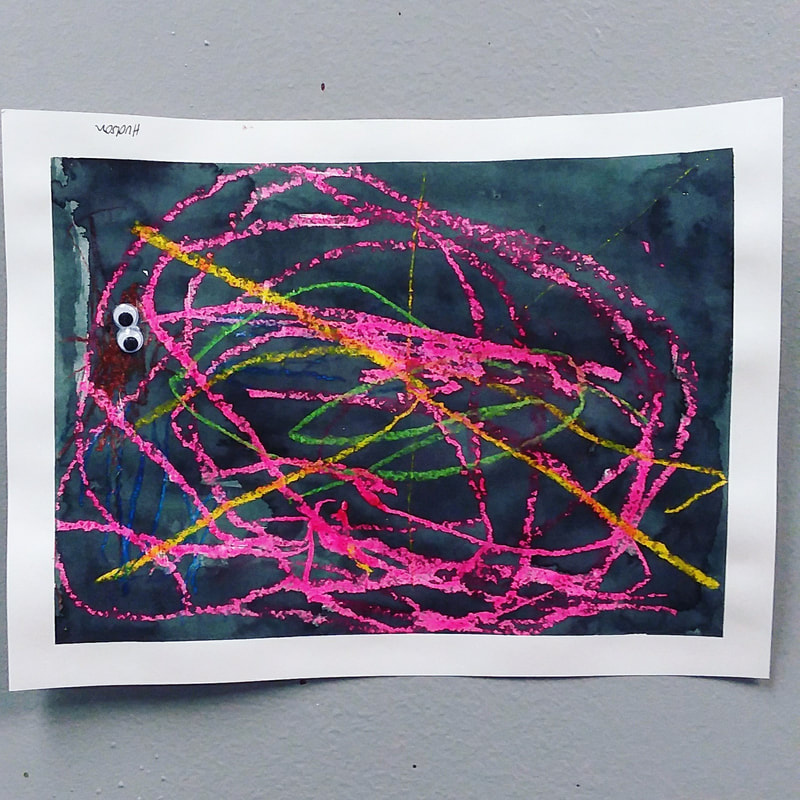 Once we have a good start on our webs, every web needs a spider! Some artists will know immediately how they want to represent the spider. Others will need help breaking it down into steps and shapes. If they need help, ask "what shape do you think our spider's body should be?" "How about the head?". "What do our legs look like?" Teachers, you can demo this drawing step-by-step for your artists: Draw a circle or a dot for the spider body and another circle/dot for the head. Add those spider legs (could be eight...could be more 😉). 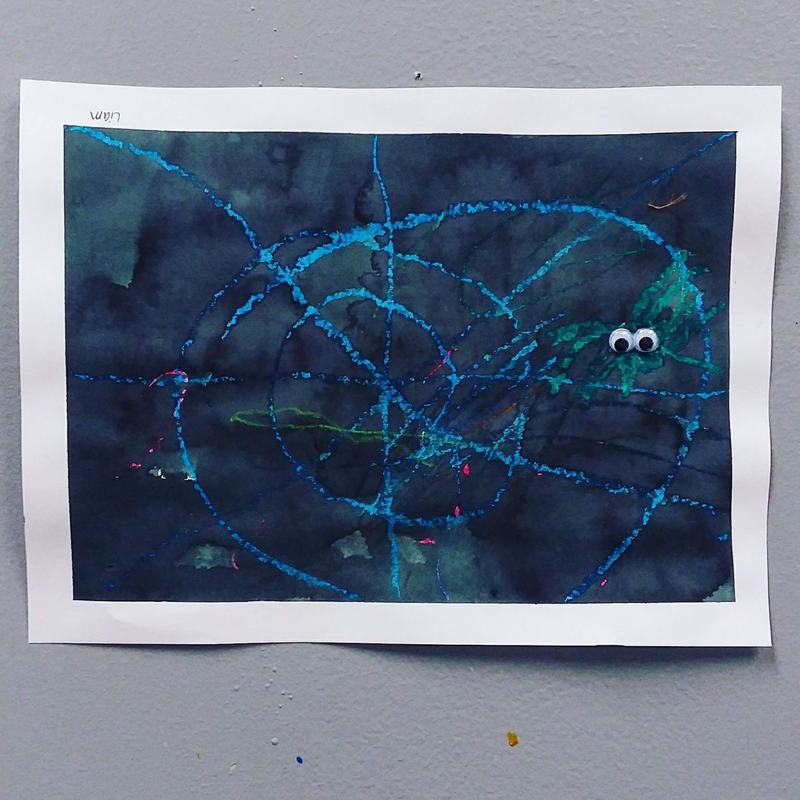 Your artists might begin to add more details to their drawings. Additional spiders. Excessive webbing. Random objects that have nothing to do with Halloween or spiders. Don't stop this. Even if it "ruins" their drawing. Follow their lead. If a racecar or Minecraft character ends up in their spider web, let it go. It's their art, not yours. 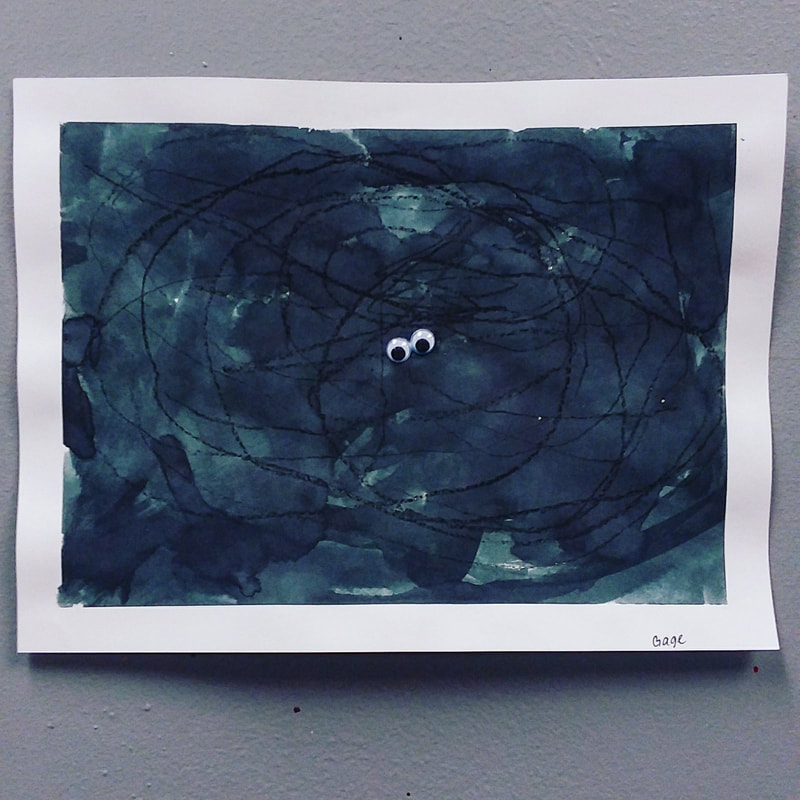 Let's make it look like nighttime. Paint the whole page with black watercolors. Remind your artists to keep the brushes juicy...don't let them dry out! Notice how the really really dark paint doesn't cover our spider web! Oil pastels RESIST the water paints on top. Yeah, science! 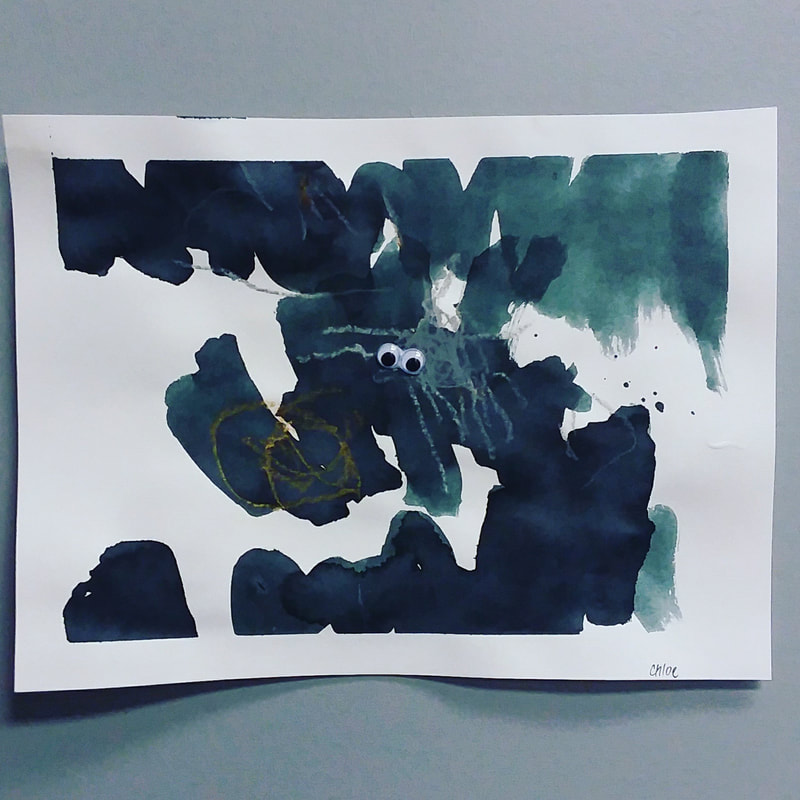 After the paint is dry, add those googly eyes with some glue and then remove the blue tape. Preschool Art doesn't have to be complicated or stressful. A few quality materials and an opening idea, question, or inspiration is all you need. Let the artists do the rest.  |
Orange EaselContent inspired by the artists and art created in our studio. 
Orange Easel began as a small art studio in my basement and continues to grow and serve our community. Read more about our story here.
Archives
April 2024
Categories
All
|


 RSS Feed
QUICK LINKS
|
|
|
|
LIBERTY STUDIO
249 W Mill St Ste 107 Liberty MO 64068 816-407-9266 |
PLATTE WOODS STUDIO
7617 NW Prairie View Rd Kansas City MO 64157 816-216-7126 |
|
Copyright © 2023 Orange Easel. All rights reserved.
Privacy Policy |
|