
Process Art is not about us. It's about them.
TIP #1: Set the expections up front
At the beginning on the year, send home a flyer about the types of activities you'll be doing in your room and WHY. If you need a template to get you started, I've got you. Click here to download a one-page document that you can personalize for your class.
TIP #2: Take pictures
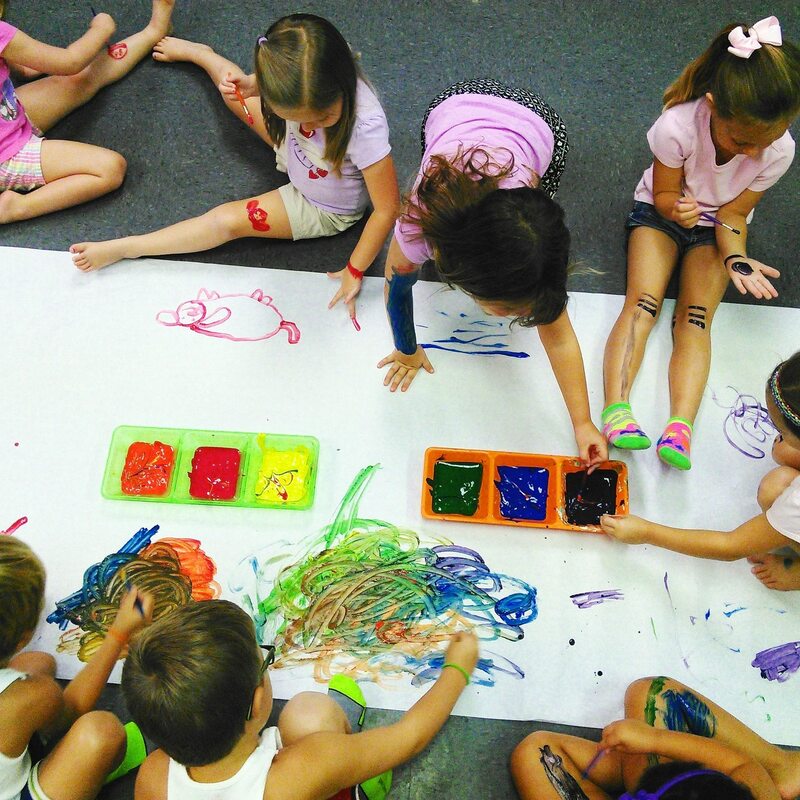
Capturing the actual creation will help parents to visualize what exactly happened. Video is even better. See how focused they are? See how they are smiling?
TIP #3: Stop sending the art home
Stop worrying about HAVING something to send home. It's okay if they don't take something home. If the process is what really matters, the product created isn't needed as proof. Don't feel like you need to keep everything. Often times in our art centers, those small quarter sheets of paper get used and left there, with no name or way of knowing who it belongs to. We usually pile them all up and save them until the end of the day JUST IN CASE someone comes back for it. If not, it get's thrown away. If the kids don't care, why should you?
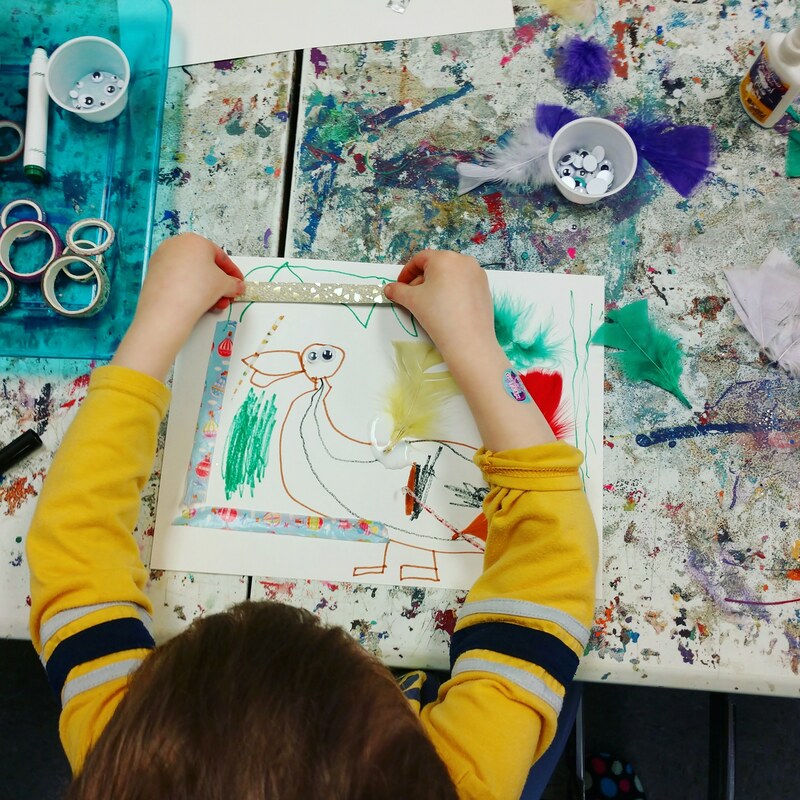
TIP #4: Make collaborative art instead
Giant collaborative art is wonderful for the classroom because it's easier to prepare, uses fewer resources, and encourages communication skills between students. Plus, when the art stays in the classroom, it can be revisited over and over (and none of the parents have to figure out what to do with the day's art.)
TIP #5: Document what the children say about their art
Write a note quoting the child's explanation of their art. Drawing for preschoolers is more about communication than it is about making something pretty. This way parents can continue the conversation at home.
I hope that those tips are helpful. What's your best tip for advocating for more PROCESS ART in the preschool classroom? I'd love to know!

FIND US ON SOCIAL MEDIA
More Process Art for Preschoolers
This post contains affiliate links.
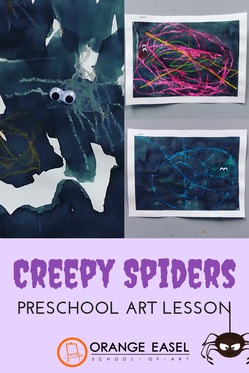
Creepy Crawly Spider WebsPrep paper with blue tape border. Teacher tip: Tape it to the table too! Since we're going to be covering the page with watercolors, this will keep the paper from wrinkling up too much. Talk to your young artists about what spider webs look like. Show some pictures of spider webs--trace the lines with your finger! Hand out the paper and invite artists to make their spider webs with the oil pastels. (After all, what are spider webs except a bunch of lines!?) 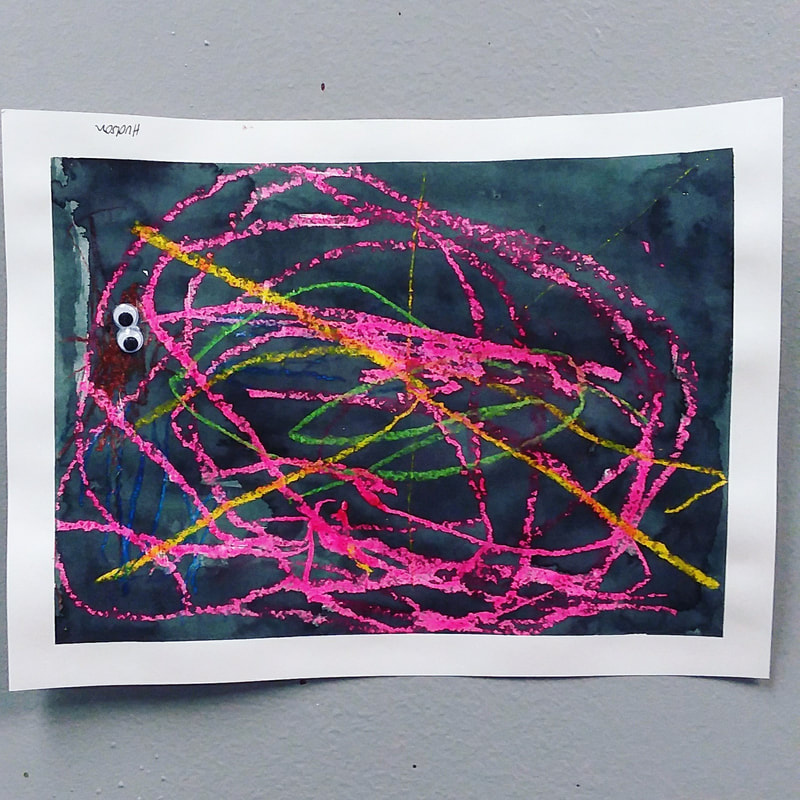 Once we have a good start on our webs, every web needs a spider! Some artists will know immediately how they want to represent the spider. Others will need help breaking it down into steps and shapes. If they need help, ask "what shape do you think our spider's body should be?" "How about the head?". "What do our legs look like?" Teachers, you can demo this drawing step-by-step for your artists: Draw a circle or a dot for the spider body and another circle/dot for the head. Add those spider legs (could be eight...could be more 😉). 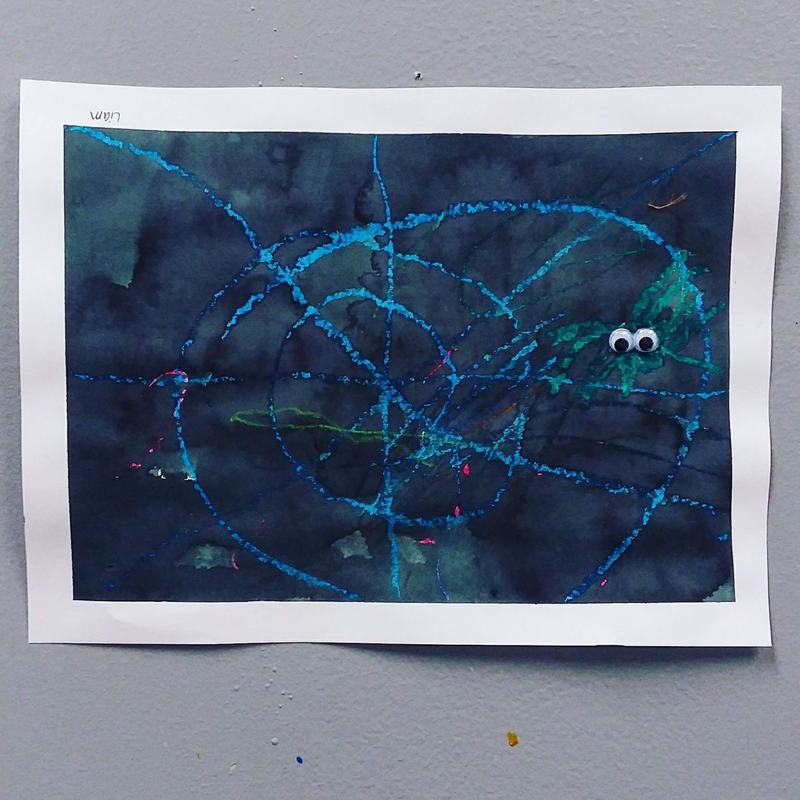 Your artists might begin to add more details to their drawings. Additional spiders. Excessive webbing. Random objects that have nothing to do with Halloween or spiders. Don't stop this. Even if it "ruins" their drawing. Follow their lead. If a racecar or Minecraft character ends up in their spider web, let it go. It's their art, not yours. 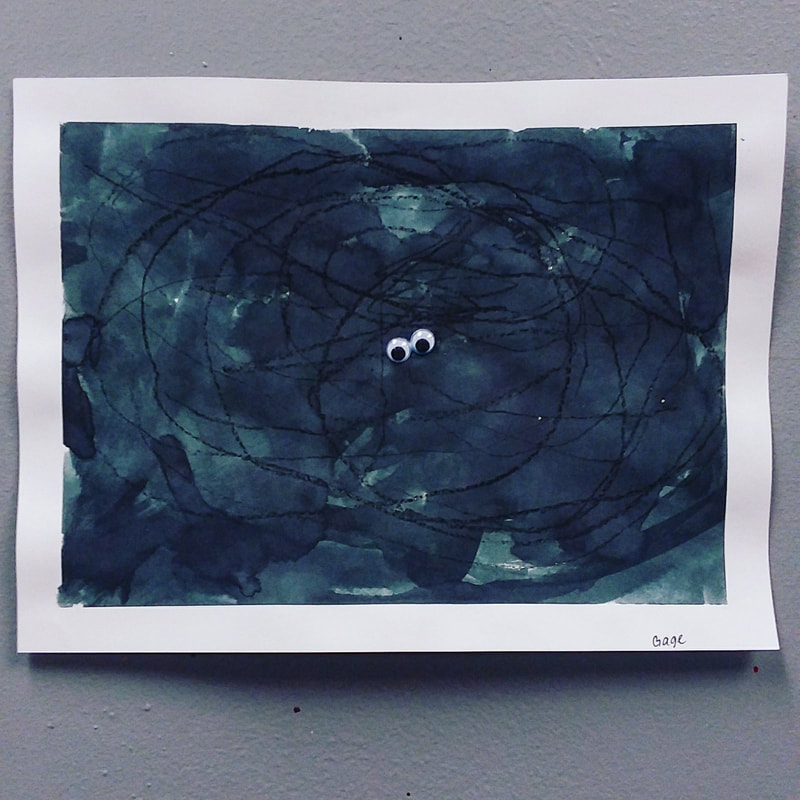 Let's make it look like nighttime. Paint the whole page with black watercolors. Remind your artists to keep the brushes juicy...don't let them dry out! Notice how the really really dark paint doesn't cover our spider web! Oil pastels RESIST the water paints on top. Yeah, science! 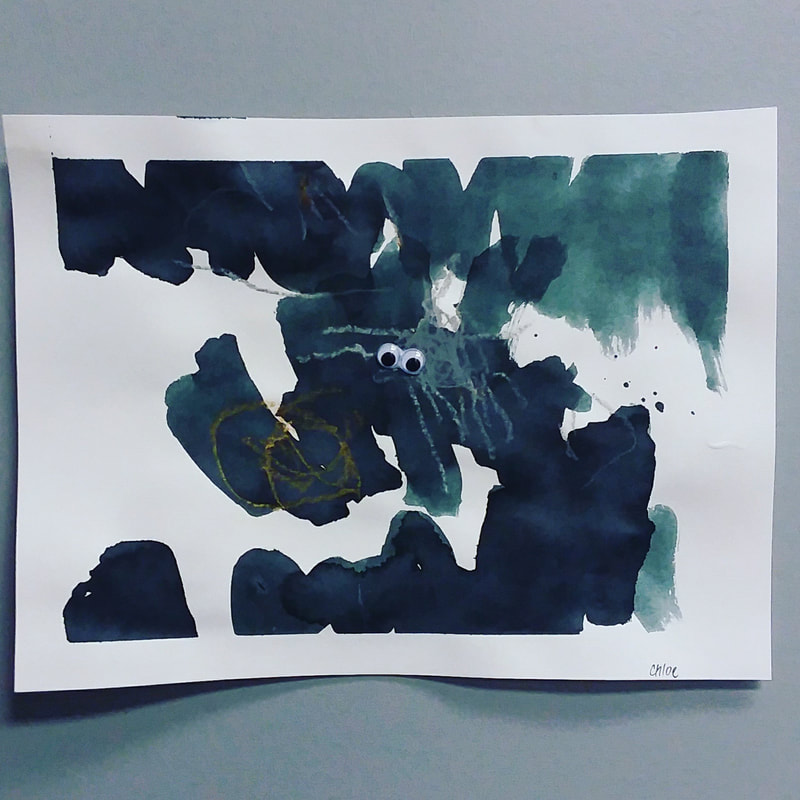 After the paint is dry, add those googly eyes with some glue and then remove the blue tape. Preschool Art doesn't have to be complicated or stressful. A few quality materials and an opening idea, question, or inspiration is all you need. Let the artists do the rest.  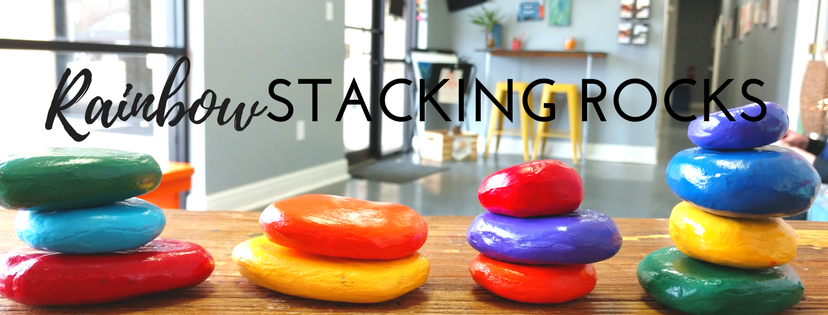
DISCLAIMER: This post contains affiliate links.
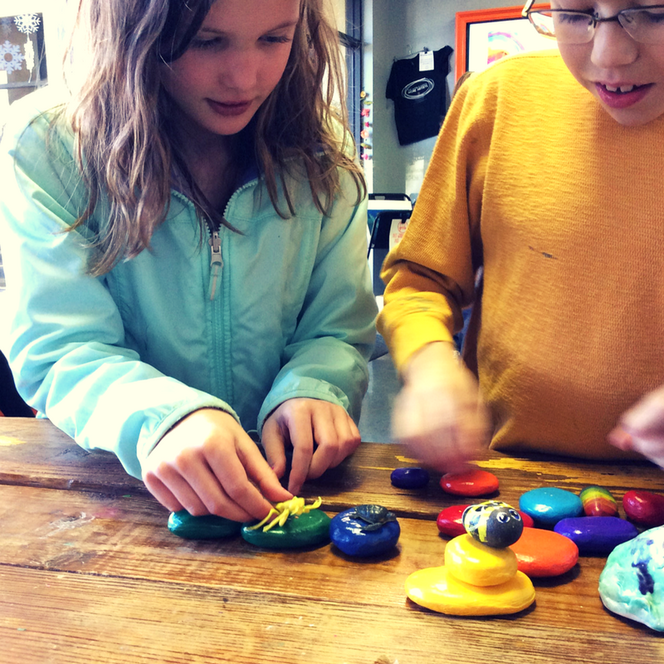
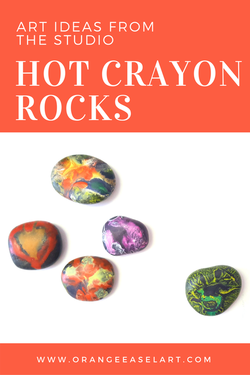
We've got this new fun toy on the front desk. Have you see them?
They totally ROCK! (<----cheesy pun)
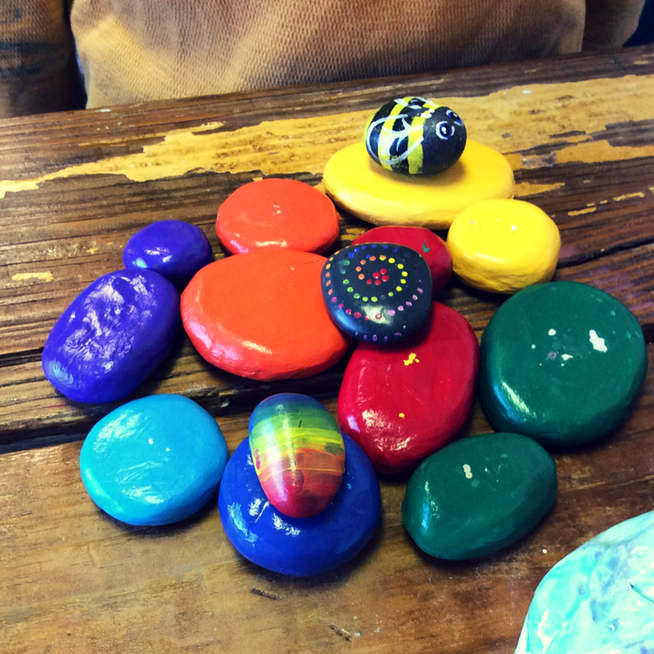
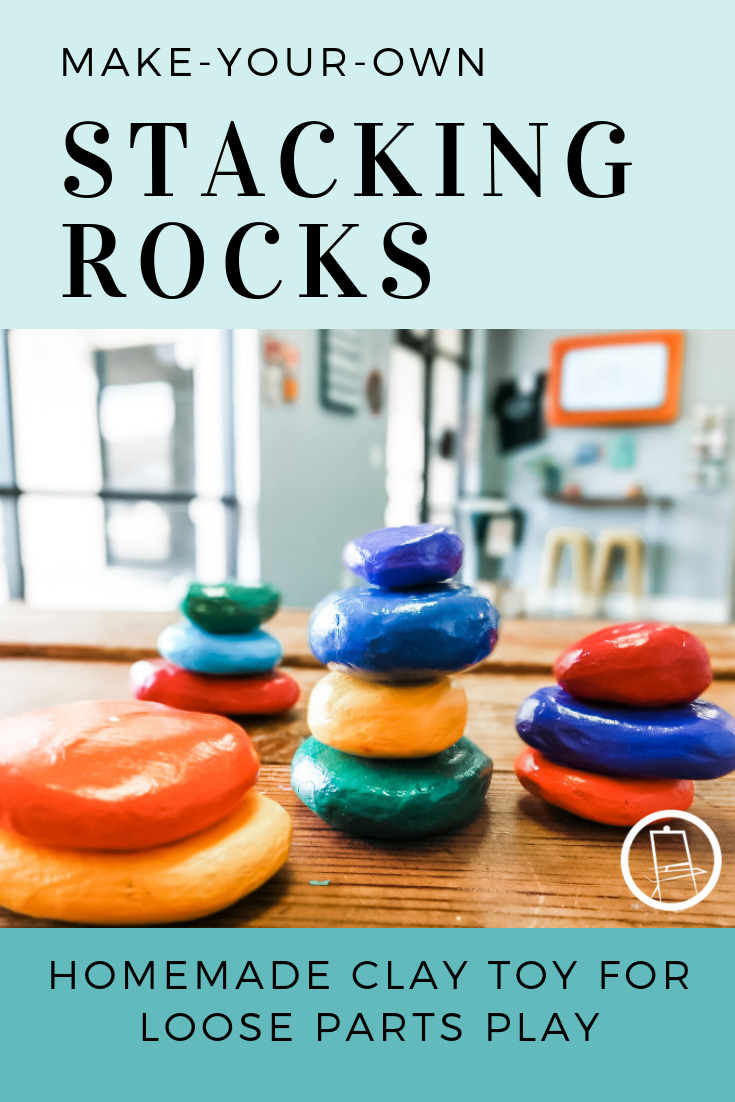
We were inspired by these wooden stacking stones by Grimm's Spiel and Holz Design. As beautiful as they are, we couldn't justify almost 60 dollars for a set of 12 stacking stones.
So we set out to make our own. And we think you should too. DIY instructions at the bottom of this post. How to play with rainbow rocks
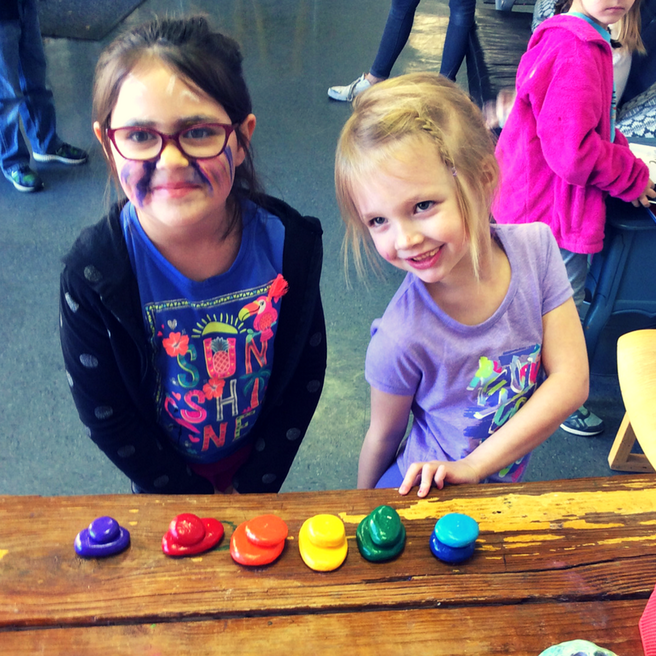
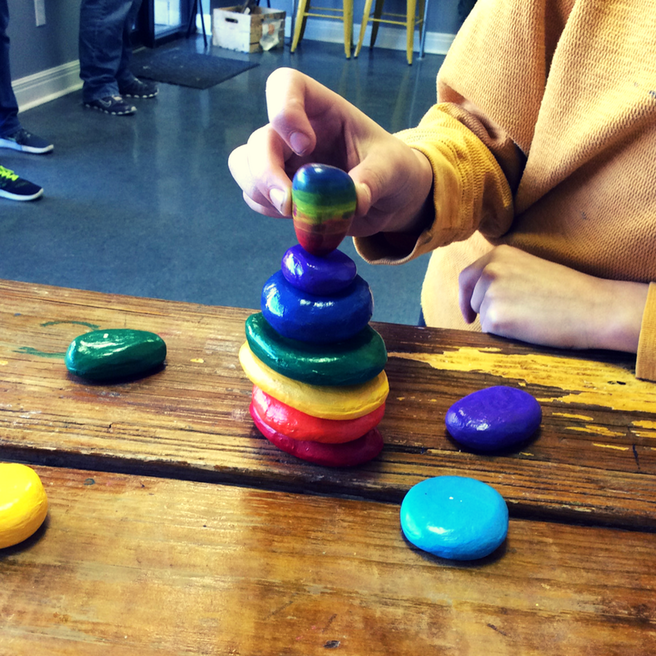
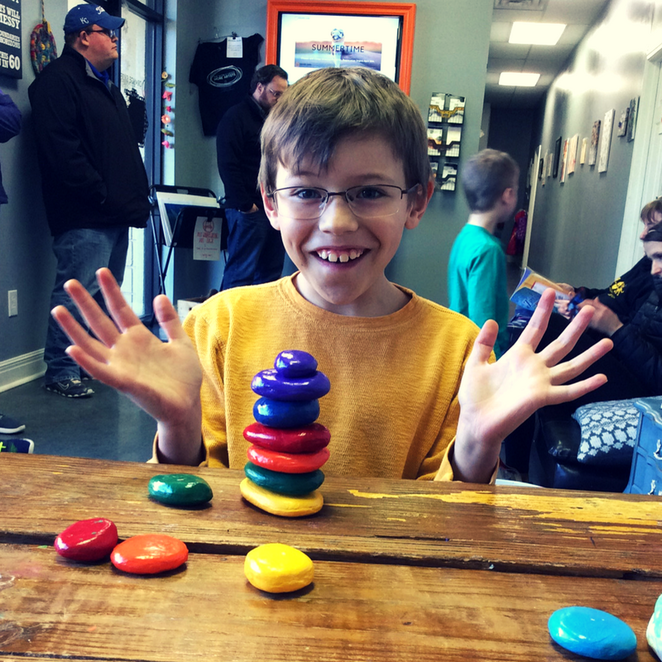
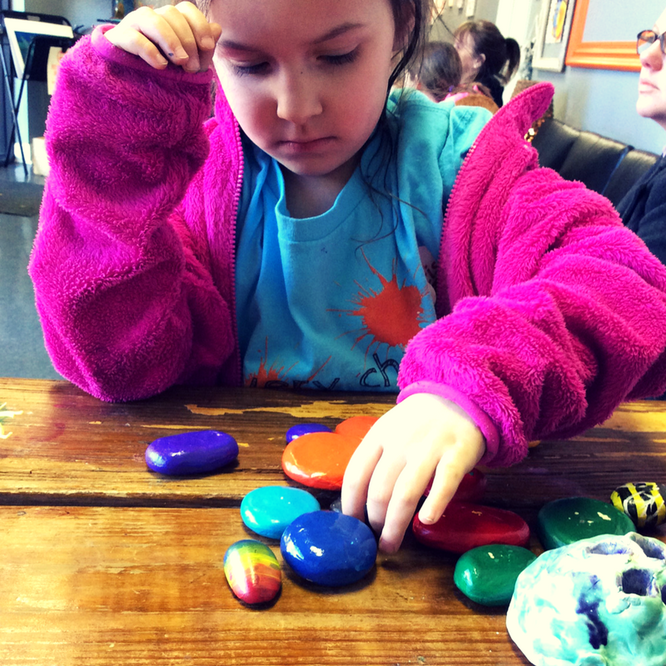
The most delightful part of having these toys on the front desk is seeing how each child plays with them differently. Some line them up into a train or a path. Some immediately begin building towers (though, four rocks is as high as we've been able to get them to balance). Some arrange them into a circle. Some match up the colors. Some hand out to the other guests in the lobby and pretend they are handing out candy.
There's no wrong way. And every child--of varying ages--seems enticed to touch, move, and PLAY with them somehow.
All of these candid and casual photos were snapped in one evening by our front desk staff.
THE IMPORTANCE OF LOOSE PARTS IN PLAY
In our experience, manipulatives like these rocks are some of the best toys. They are "loose parts" that will empower our creativity and challenge our problem solving skills.
In early childhood education settings, loose parts mean alluring, beautiful, found objects and materials that children can move, manipulate, control, and change while they play. Children can carry, combine, redesign, line up, take apart, and put loose parts back together in almost endless ways. The materials come with no specific set of directions, and they can be used alone or combined with other materials. Children can turn them into whatever they desire: a stone can become a character in a story; an acorn can become an ingredient in an imaginary soup. These objects invite conversations and interactions, and they encourage collaboration and cooperation.
If you're interested in learning more about loose parts, check out pinterest board for resources and inspirations.
STEP ONE: Shape
If your clay is too tough, break it into small pieces and gently condition it with the hands. You can also spray it with a mist of water to help soften it (but not too much!). Our rocks are varying sizes...round or oval and in between 1-3 inches in diameter. You can make your rocks any size, but be sure that they have a pretty flat top and bottom surface so that they can stack.
STEP TWO: Smooth
Once you have the general shape of your rocks, you can smooth out the clay by dipping your finger in water and rubbing it along the surface.
STEP THREE: Dry
Place the rocks on parchment paper or wax paper and let them dry completely for about a week. We flipped ours over halfway through just to make sure that some air got to the underside.
STEP FOUR: Paint
Acrylic paint works best. You can use any colors. We went with the rainbow on our first set, but the next one we made (for the Platte Woods studio front desk), we painted with blues and greens, and we even added some design details. On both sets, we made sure to get a couple good coats of paint and to wait for one side to dry before flipping them over. If you're impatient, a hair dyer works to speed up the drying time. 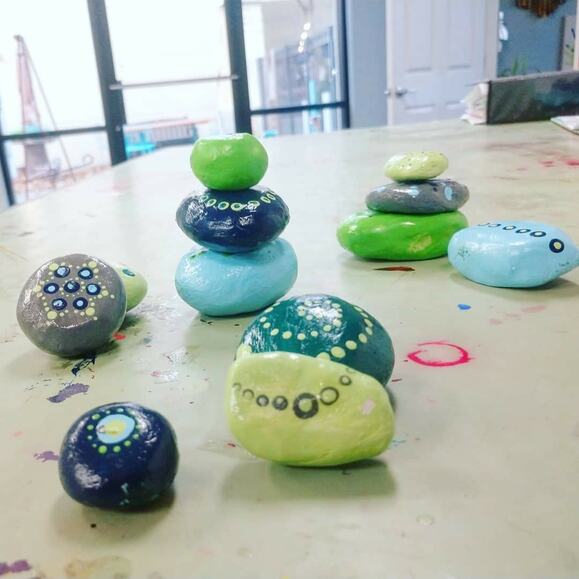
STEP FIVE: Spray
The clear coat will protect the paint. If you want your rocks to be shiny, use a glossy clear spray. Otherwise, a matte would be beautiful too. Watch our Video Tutorial
We went Live on Facebook recently to show how to make these popular clay rocks!
CARING FOR YOUR "ROCKS"
Obviously, these aren't really rocks. Clay will break if it is dropped on a hard surface. We've got our rocks sitting on the desk for easy accessibility. They have tumbled quite a few times and hit the tiles below. So far, aside from a few chips in the paint, our rocks seem to be doing pretty well. We anticipate that they will eventually split or break after enough falls. But, that's okay, we'll just make more. :)
For home use, we could recommend stacking your rocks on a surface above a rug or carpet to ensure longevity of your new toy. Or, just play with them directly on the floor to avoid the three-foot drop all together. ;) If you make rocks for your home, classroom, or to gift to a friend, please send me a picture or tag me on social media! I'd love to see! 
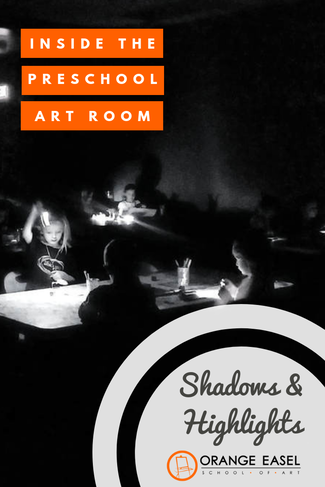
This is part two of my musings on art in the dark lately. We just finished our Light and Dark unit with our preschoolers (read more here) in the studio. I'm hoping THIS post inspires you to incorporate dark play into your home.
Although my kids are almost teenagers, I remember what winter was like with kids cooped up all day. I remember the post-nap, pre-dinner hours being the worst. It was cold. It was dark. And everyone was cranky. On these short winter days, my kids would BEG to play in the dark. They would help me pick up the main rooms in the house (I told them it was for safety) and once everything was clean...er, I mean, safe, we would turn off all the lights in the house. Then, we would get out the different lights and PLAY. The possibilities are limitless. Just normal play is novel when you have to use a flashlight to see it. But of course, art is our favorite kind of creative play. And since we're an art studio, I've compiled a list of some of my favorite Art-in-the-Dark ideas for home use. No fancy supplies needed. Just some basic art supplies and a light source. (there's a light source list at the end too) At-Home Ideas
Capture the Shadows
Shadow Building
Build a Light Box
Mess-Free Finger Painting
Paint right on top of the light and see those colors in a whole new way! Fill a gallon zip-top plastic bag with a few dollops of paint. Secure the edges and top with clear packing tape and tape flat to the light table**. Artists can squish the paint around in the bag to mix the colors. Older artists can even draw designs in the paint.
**You can do this same one in light too. Tape to a window or glass door and the sunshine will make a similar effect. Plus, the vertical work surface conditions those core stability muscles and shoulder muscles that all kids need for great fine motor skills.
Sand Drawings
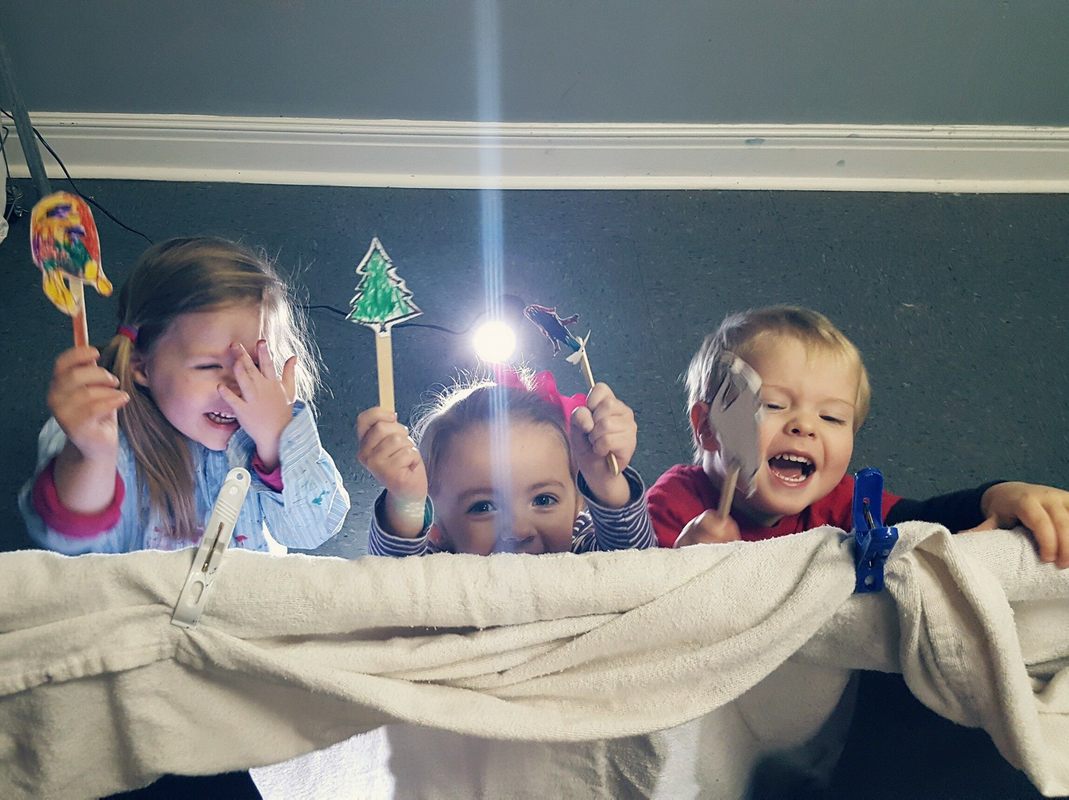
Shadow Puppet Theatre
Lighting Options
Start building your collection of illuminating toys! Here are some of our favorites:
Valentine's Day Puffy Slime
Light and airy. Like playing with fresh-smelling marshmallow dough. This slime is great by itself, but for extra special occassions, try making a few different colors (different batches) and and swirl together to create a beautiful visual effect.
Click the video link below to watch our facebook live video for the recipe and instructions:
Valentine's Day Slime with Heart Confetti and Glitter
This slime is more dense than above and made with clear glue so that those pretty, sparkly add-ins can really shine.
Click the video link below to watch our youtube video for the recipe and instructions:
Borax Solution for Slime
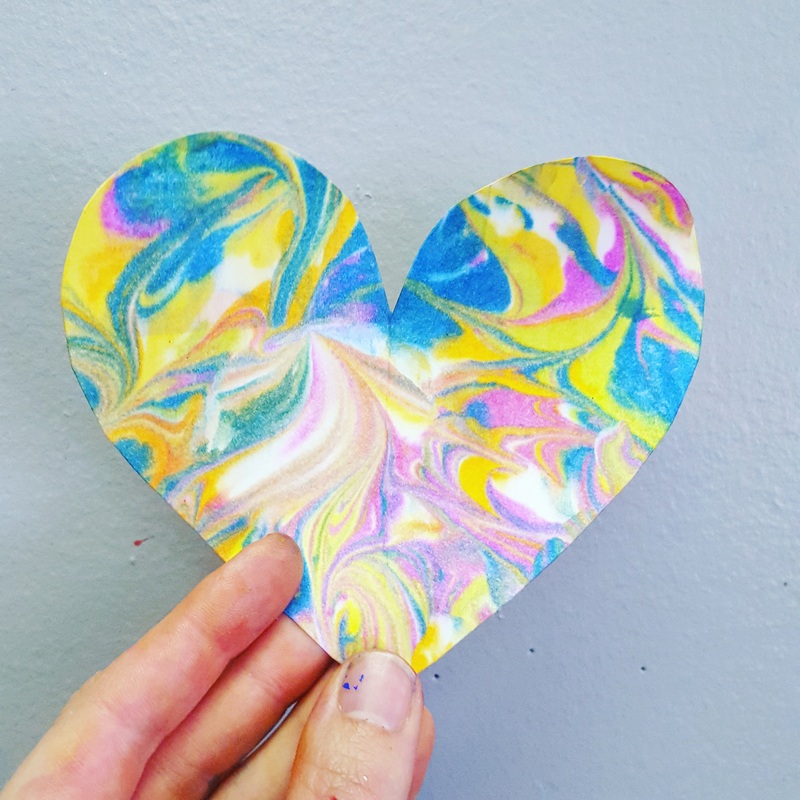
More heart art:
Check our how to make this paper heart garland:
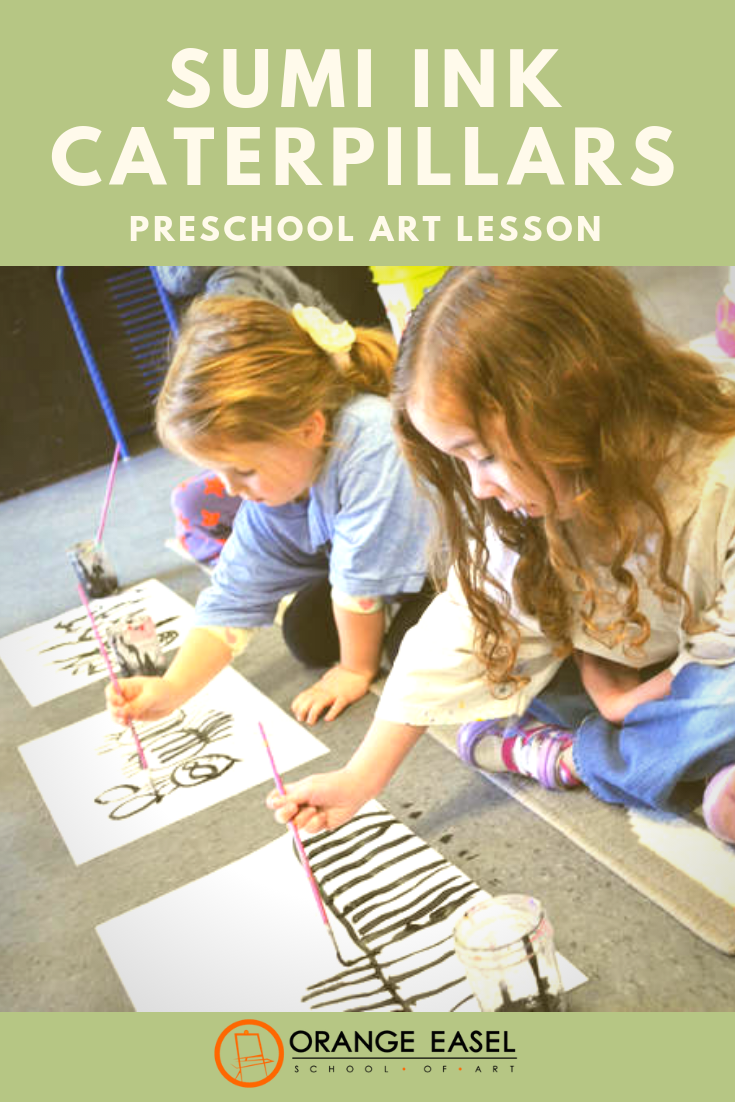
This week, we tried something new in our preschool classes: We used sumi ink and brushes to draw. Since our class was all about caterpillars today, we drew caterpillars. I think you could draw anything. Butterflies would be fun. And I can't wait to do self portraits like these (It's on the schedule for one of our summer classes).  We began by looking at photographs of caterpillars and talking about the different parts of a caterpillar. We learned that there are different kinds of caterpillars that have different features. I had the children give me directions on how I should draw a caterpillar on the white board.  Then we passed out large sheets of paper and invited the artists to find a spot on the floor to work. I feel like for the scale of the paper and the length of our brushes, the floor was the best place for them. We handed out a small amount of ink in individual glass jars (like a tiny bit of ink...a little goes a long way!).  There's something magical about preschool line drawings. They are bold. Their subjects are both simplified and amplified. Usually we do them with black sharpies. But INK is a whole 'nother level.  Sumi ink is rich, black liquid. It paints on so smoothly. And it covers the surface quickly (which is important for preschoolers). Unlike the sharpie, a brush gives us thick lines and thin lines. And even some scratchy lines where our artists were running out of ink.  Unlike our tempera paint, the ink isn't gloppy and thick. But it also doesn't run and drip like watercolors. It's the perfect consistency.  If you try out some sumi ink at home, make sure that you protect your surfaces and wear a paint shirt!
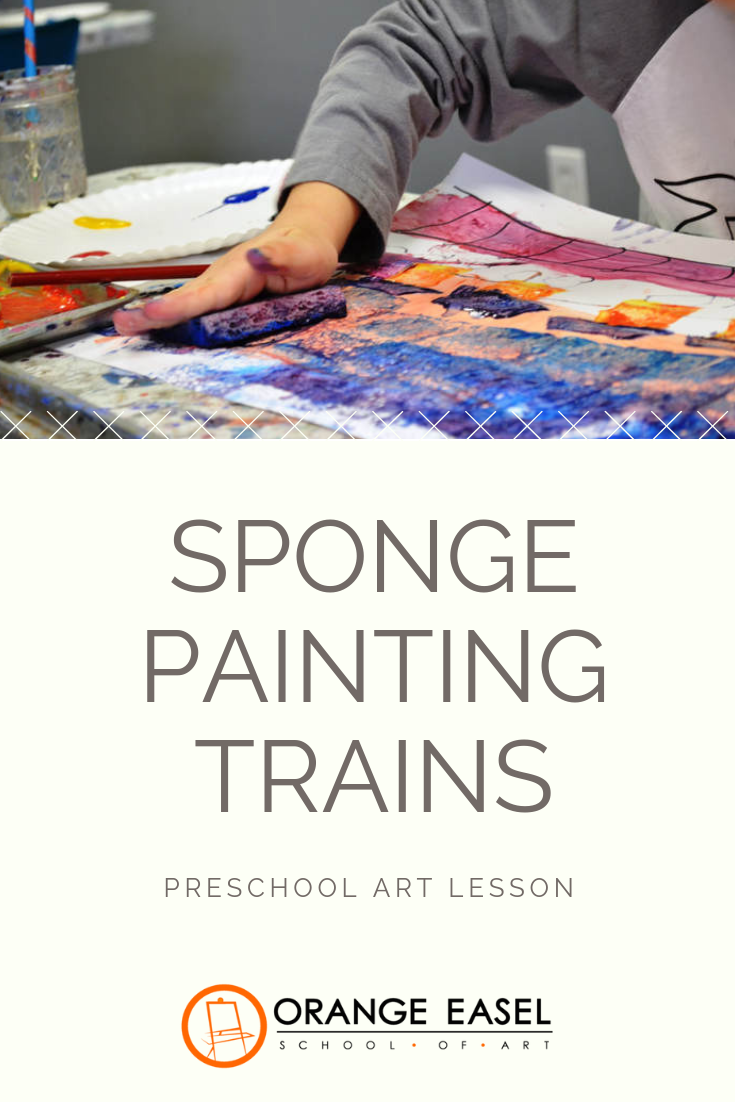
(And get those frames ready because you're going to need them!) Today's lesson was to nail down what a horizon line was in a landscape picture. To help us teach the lesson, we shared the book, Freight Train by Donald Crews. It's a simple book with not very many words which enabled us plenty of time to talk about the illustrations. After reading the book, we took turns adding to a large-scale, collaborative drawing of a horizon with a train. Then each artist got a chance to make their own drawing on a smaller scale in their journals. We returned to our art tables to find paint, pencils, markers, brushes and sponges:  We used 11x14 inch paper which is larger than our typical drawing and painting paper. Using a marker, our artists began by drawing a horizon.  Artist worked so intently to create their trains.  The sponges we're using are just inexpensive kitchen sponges that we had cut into simple shapes. They shape could be combined to make cars, wheels, smokestacks, and roofs.  In addition to how wonderfully functional the sponges are, squishing them in paint is just fun.  The creativity on each artists' train and background was really fun to witness!

er\\This picture book tells the story of a boys adventure through the woods with a flashlight. He discovers many animal friends using his flashlight. The illustrations are primarily black and white. Only the subjects illuminated by the beam of light are in color. The darkness surrounding his is illustrated in a lower-contrast grey.

Our artists enjoyed telling the story (since their are no words) and looking deep into the shadows to see if they could see what was happening behind the scenes, unknown to the boy and his flashlight.
In reading our story, we pointed out the uniqueness of the illustrations and the artist's use of contrast. Then, we gave our artists some charcoal to respond to the story in their journal. We used both compressed charcoal, charcoal pencils, and white charcoal. We also had blending stumps. 
Artists worked inside their journals which keeps a record of each story we read.

Blending and smudging the charcoal is the best part.

Our responses to the story show the same darkness, shadows, and low contrast as the book illustrations. Some of our artists chose to document the animals while other drew the boy.

Our journals each got a quick spray with fixative and a sticker to label the date and the story. And then we moved on to the next activity! (nothing in our 90 minute class lasts more than 15-20 minutes).
I hope we've inspired you to explore shadows-and-highlights with your preschoolers either at home or in the classroom!

More from the Preschool Art Room:
 We call this "dangerous art." It gets their attention. The rocks are hot (heated in the oven) and the crayons just ooze over the top, encasing the rock in a marbled rainbow shell. The process is oh-so-satisfying in itself. But the product is also delightful: a silky, swirled treasure stone. We've created a video tutorial for you to try this out at home with your young artists (or old artists--Our instructors love doing this one!). Here's what you'll need:
Orange Easel Video TutorialAfter you've made your rocks, snap a picture of you with your little treasures so we get to see your creative products! #ArtistsInspireArtists Tag us @orangeeaselart.com on Facebook, Instagram, and Twitter!
DISCLAIMER: This post contains affiliate links.
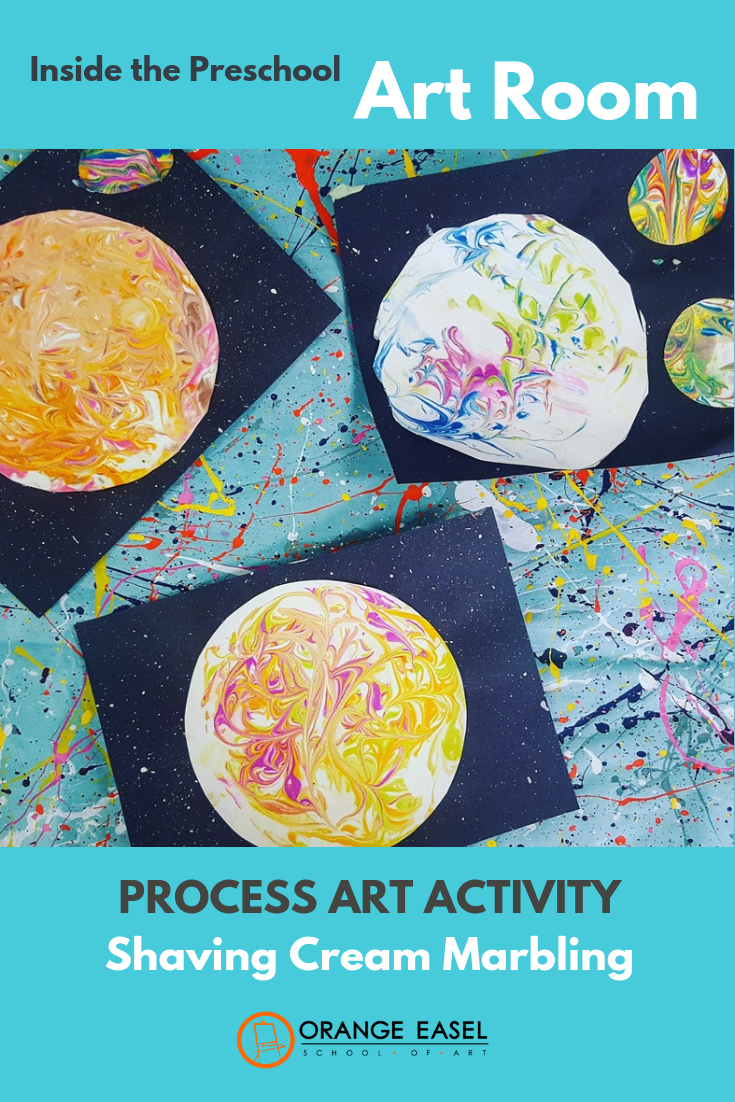
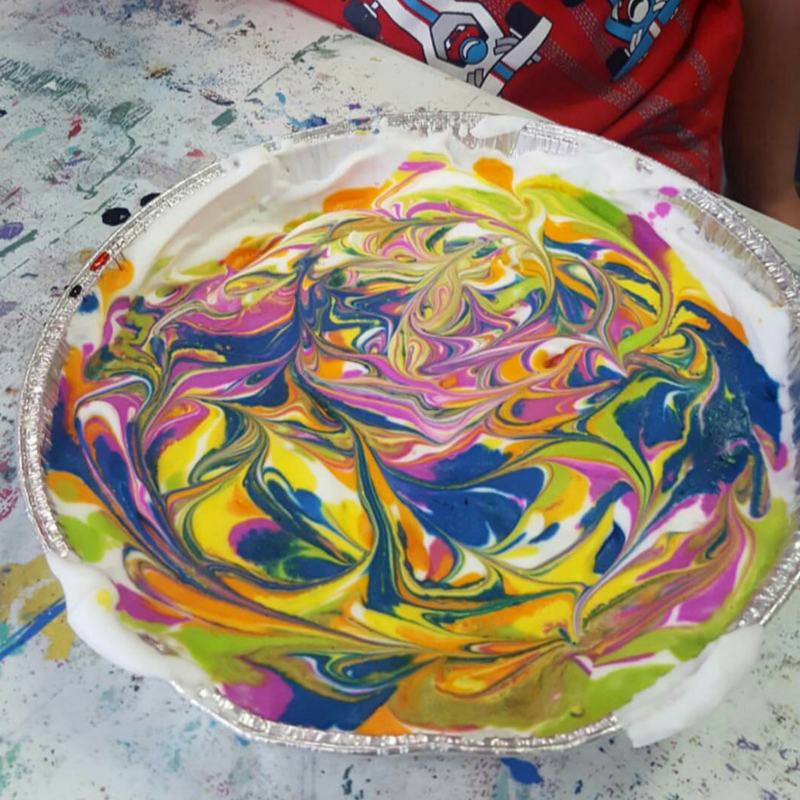
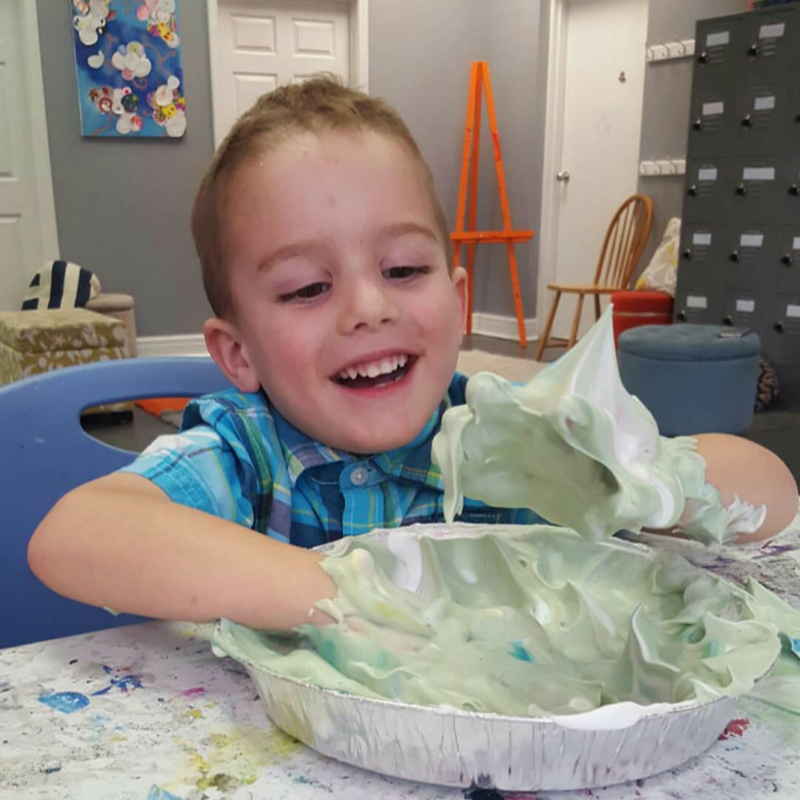
For older artist, the results are stunning and the design possibilities are endless. For younger artists, the process of squirting out the shaving cream and dropping the color is great for fine motor development (not to mention, it's fun to play in the colored shaving cream when your done!).
For a edible version, try whipped cream instead of shaving cream. The colors aren't as bright, but it's safe for the really young artists to put in their mouths. Quick Video
See below for detailed, written instructions. But here's a super quick tutorial that we did live on our Facebook page.
Step-by-Step
Step One: Squirt the shaving cream into the pie plate.
You need complete coverage but it doesn't need to be deep. We usually look for about half an inch. You can use a spatula to spread it evenly around when your done squirting it out.
Afterward, you can drop in more color, swirl again, and repeat the printing process. Or, you can just enjoy the shaving cream as a sensory play invitation.
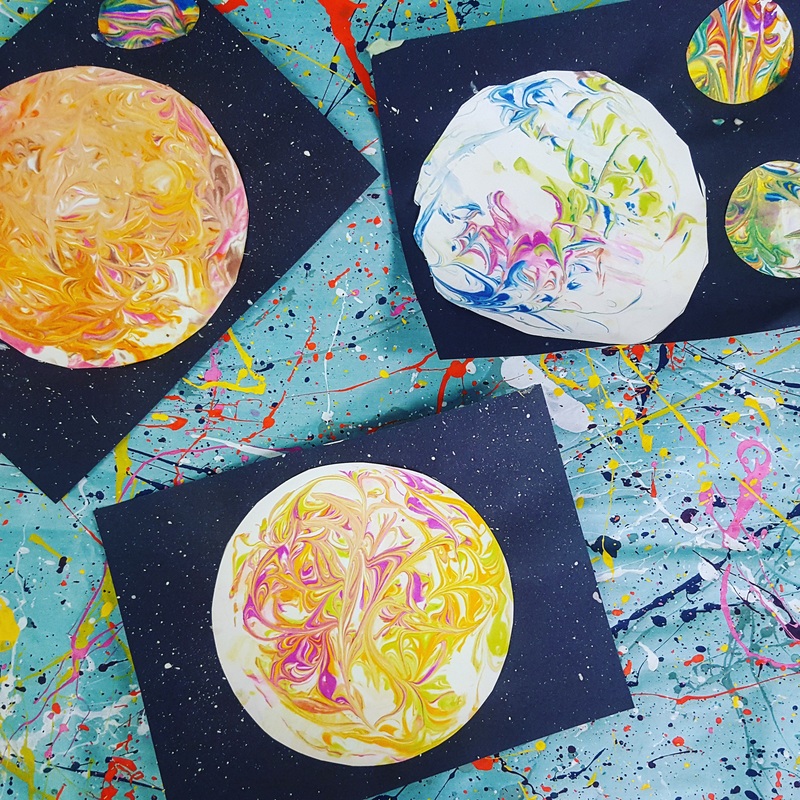
We recently use our shaving cream prints to make planets. We splatter painted a piece of black construction paper with white paint and then glued on the marbled planets.
These printed papers are perfect for collages (think spring flowers, fall leaves, etc). They also make a beautiful set of notecards!
Supplies used: |
Orange EaselContent inspired by the artists and art created in our studio. 
Orange Easel began as a small art studio in my basement and continues to grow and serve our community. Read more about our story here.
Archives
April 2024
Categories
All
|


 RSS Feed
QUICK LINKS
|
|
|
|
LIBERTY STUDIO
249 W Mill St Ste 107 Liberty MO 64068 816-407-9266 |
PLATTE WOODS STUDIO
7617 NW Prairie View Rd Kansas City MO 64157 816-216-7126 |
|
Copyright © 2023 Orange Easel. All rights reserved.
Privacy Policy |
|